Showing posts with label Altered Items. Show all posts

Saturday, September 25, 2010

Our Daily Bread Designs {Challenge 31}

Oh, today's challenge is one of my favorites--"Wing It"--Create a project that includes something with wings (it can be an embellishment and does not need to be the image). Butterflies and birds have always been my favorite "winged things." Butterflies because they show I am a new creation in Christ, and birds because I LOVE them. I guess that's why I have two parrots. LOL!

So, what did I do with the "winged challenge"? Well, I altered a notebook of course! :) I needed a notebook to keep track of the books I read and am going to read. Since I have gotten my new Kindle, I get SO many free books, that I can't keep track of them all. So, this will help with that little issue! For my notebook, I chose to use butteflies as my "winged items." I also used three ODBD stamp sets--Fleur de Lis Borders, Happy Birthday (for the verse & small butterfly), and Don't Worry (for the large butterfly).

Papers: We R Memory Keepers Tiffany's
Stamps: Our Daily Bread Designs Fleur de Lis Borders, Our Daily Bread Designs Happy Birthday (verse & sm. butterfly), Our Daily Bread Designs Don't Worry (lrg. butterfly)
Stamp Ink: SU close to cocoa, VersaMark, Ranger clear ep
Embellishments: KaiserCraft rhinestones, misc. ric rac, Stickles cinnamon, Pop Dots, Bo Bunny Double-dot ribbon, Quickutz tab die

If you would like to see more challenge creations, please be sure to check out the other ODBD Challenge Team creations here:

Chris Olsen
Chris Dickinson
Francie Gumprecht
Sabrina Jackson

To see all of the challenge and prize details, please see the ODBD blog post here. Yes, there are prizes, so you don't want to miss the details! Also please don't forget to upload your creations to Mister Linky in the same post by Thursday, September 30, at 8 p.m. EST to be eligible! Remember to use Keyword ODBDSLC31 when posting to online galleries. Thanks for stopping by, and blessings to each of you!
Photobucket

Monday, September 6, 2010

Creating Today? How About a Clipboard!

For those of us in the U.S., today is a holiday! Yeah! Hubby is home, the kids don't have to run to tutoring or music lessons--just a wonderful day at home! I am hoping to scrap a page or two but I thought y'all might like to see what I made for myself and for Memory Box! I included all instructions so if you want something to create today, how about altering a clipboard like this:
You can find all three posts containing very detailed photos and instructions here:

Altered Clipboard {Part 1}
Altered Clipboard {Part 2}
Altered Clipboard Finished {Part 3}

I hope you enjoy, and I would love to see what you create! Happy crafting!
Photobucket

Tuesday, August 24, 2010

Tuesday's {Tip} Altering a Notebook

Many of you saw the notebook I made for BSF using Our Daily Bread Designs stamps. Well, I received an e-mail from Eva asking the following:

"What kind of journal or notebook do you buy? I have seen some but they don't have lines in them. What do you recommend? Also, what adhesive do you use? I have found that sometimes they come off after you use the notebook for a while (I attempted one years ago and it did not work very well)."

I then received a few other inquiries, so today I thought I would share how I alter a notebook.

Type of Notebook
The notebooks I use I buy either at Wal-Mart, Target, or my local grocery store. They certainly are nothing fancy. Here is the style I love:
These notebooks are made by Carolina Pad, and you can see a list of stores that carry their products by clicking here. The artwork on the front varies every single year but I don't buy it for the front artwork since it will be covered up anyway. What I love about this particular notebook is the size (8.6" x 6.5"), the number of lined pages (120 pages), the two-subject plastic taps with a folder pocket in the front, and the fact that they are easy to alter.

Adhesives & Getting it to Stick!
This can be the most frustrating part about altering books--getting things to stick without them falling off years later! I have found a combination of Scor Tape, Mod Podge, sand paper, and a brayer work great for me! The sandpaper is key to getting it all to stick so please don't forget the sand paper! :) I use a Tim Holtz sanding block but you certainly can use just a plain piece of sandpaper. Here is what I do to alter the notebook:

1. Sand the front of your notebook (sand the back also if you are finishing the back).

2. Wipe off dust with a very damp paper towel and set aside until Step 6.

3. Paint the edges of your notebook with acrylic paint if you don't want the original pattern to show through. I use a very small paint brush to get under the wire. It goes very fast, and I much prefer doing that than taking the wire out! If you notice in my samples below, I don't always paint the edges.

4. Next create the front of your notebook. I create it by sewing and adding all of the flat embellishments before adhering to the notebook.

5. Once the front is complete with the flat embellishments attached (die cuts, sewing, rub-ons, stamps, stickers, etc.), you can adhere it to the notebook.

6. I adhere the front in one of two different ways. I have used both ways. Both hold up, and I like both.

Option 1: Put a thin layer of Mod Podge or Matte Medium on your notebook and on the back of the paper to cover the notebook. Place on cover and use your brayer to make sure the bond is strong!

Option 2: Cover the back of the paper with Scor-Tape. It does take a lot of tape but it is worth it. I have found if you just do the edges, you get too many bubbles when adding the Mod Podge or Matte Medium. Once you have the tape on your paper, put a thin layer of Matte Medium on the notebook and place the paper on top. Use your brayer to make sure the bond is strong!


7. Once you have attached your paper, add a thin layer of Matte Medium on top of the paper to seal it! Let dry. You can add a second layer if you wish but it is not necessary.

8. Once it is dry, attach your lumpy embellishments (buttons, brads, ribbon, Dymo labeler, chipboard, felt, etc.) to finish!

Note: To attach lumpy embellishments, I always use Glossy Accents. That stuff holds up forever. Love it!

Finishing the Back of the Notebook
I like to finish the back of my notebooks too; however, I don't use a lot of my nice papers and of course I don't use any embellishments. I make it match but I make it easy also. :) I add a scrap of paper that matches the front, stamp my name, initial it, and put the date I created the notebook. I adhere it the same way I adhere the front, and I also put a sealing layer of Mod Podge on the back too.
To see information on my personalized stamp, please see this post here.

Finished Notebooks
Here are just a few of the Carolina Pads I have altered with the first photo being the most recent. Notice how some of the edges are painted and some are left "as is."

Pin It
I hope this has been helpful. Please feel free to ask questions in the comment section, and I will reply there. :) Have a blessed Tuesday!

Saturday, August 21, 2010

Our Daily Bread Designs {Challenge 26}

Ooooh, it's time for another fun challenge, and this week's challenge is super easy: Use punches or dies on your creation. I think most of us probably use dies or punches on every creation so I hope a lot of you will play along!!!

Well, it's almost time for Bible Study Fellowship (BSF) to start! In fact, I am in San Antonio today at a BSF Area Workshop! :) Each year as we begin a new study, I create a new notebook for my notes. I have years and years of these notebooks in my bookcase filled with amazing notes from studying Scripture. Someday I hope my girls will enjoy them. Anyway, we are studying the Book of Isaiah this year. Today's challenge along with two ODBD stamps sets were perfect for my new BSF Isaiah notebook! I used 4 different dies on this notebook along with 2 different ODBD stamp sets--Scripture Collection 3 and Scripture Collection 4. Notice how I just stamped the names of God on my notebook from these sets. The Cross die I used is also available in the ODBD store here. It's a great one to have on hand!!!
Papers: Webster's Pages Grace, Basic Grey Bittersweet, Paper Trey Ink kraft
Stamps: Our Daily Bread Designs Scripture Collection 4 (Jesus), Our Daily Bread Designs Scripture Collection 3 (God, Lord)
Stamp Ink: Colorbox Pigment Ink chestnut, SU creamy caramel
Dies: Paper Trey Ink Just the Ticket and Spiral Notebook Page, Spellbinders Cross Collection and Large Labels
Embellishments: Making Memories rose petal paint and brads, Mod Podge, Rose Moka alpha stickers, Jillibean Soup felt flowers, Dymo labeler, Shimmerz Spritz baby's breath, Paper Trey Ink buttns and rustic twine, Deluxe Designs chipboard heart, sewing machine


If you would like to see more challenge creations, please be sure to check out the other ODBD Challenge Team creations here:

Chris Olsen
Chris Dickinson
Francie Gumprecht
Sabrina Jackson

To see all of the challenge and prize details, please see the ODBD blog post here. Yes, there are prizes, so you don't want to miss the details! Also please don't forget to upload your creations to Mister Linky in the same post by Thursday, August 26, at 8 p.m. EST to be eligible! Remember to use Keyword ODBDSLC26 when posting to online galleries. Thanks for stopping by, and blessings to each of you!
Photobucket

Saturday, June 26, 2010

Our Daily Bread Designs {Challenge 19}

This week the ODBD Challenge Team is bringing you a little different challenge. We want to see everyone create a bookmark! I haven't created one in a while so this was very fun for me! I hope you have fun with it too!

My favorite kind of bookmark is a magnetic bookmark. So for our challenge today, that is what I created! I used two different stamp sets from Our Daily Bread Designs. The sentiment comes from the new set called "Scripture Series 1," and the flower image comes from the set called "The Lord Has Risen." The bookmark base is actually recycled packaging. I thought the weight of the chipboard and the green polka dot was too cute to throw in the trash!
Papers: Basic Grey Green at Heart, Making Memories packaging for bookmark base (green polka dot)
Stamps: Our Daily Bread Designs Scripture Series 1, Our Daily Bread Designs The Lord Has Risen
Stamp Ink: Memento bamboo leaves, Palette burnt umber, Ranger clear ep
Embellishments: Melissa Frances ric rac, sewing machine, Jillibean Soup journaling sprout, Basic Grey small magnet, Stickles lime green, DMC floss


If you would like to see more fun bookmarks, please be sure to check out the other ODBD Challenge Team creations. And be sure to leave Christine, Natalie, and America some extra love. Sadly, all three of them are leaving the ODBD Challenge Team. I am really going to miss their incredible creations! You girls are amazing!

Chris Olsen
Christine Okken
Francie Gumprecht
Sabrina Jackson

Have fun creating your bookmarks, and to see all of the details and prizes for this week's challenge, see the ODBD blog post here. Also don't forget to upload your creations to Mister Linky in the same post by July 8th at 8 p.m. EST! Yes, you get a little longer for this challenge so I hope to see lots of you play along! :) And finally, remember to use Keyword ODBDSLC19 when posting to online galleries. Thanks for stopping by, and blessings to each of you!
Photobucket

Wednesday, March 17, 2010

ODBD Anniversary New Releases & Blog Hop!

Today is a VERY special day for Our Daily Bread Designs. You know we have been celebrating for several days, and today marks the 2nd Anniversary for Kelley at Our Daily Bread Designs! And we are celebrating in a huge way today! We are having a Design and Challenge Team Blog Hop, and Kelley is releasing FOUR new special edition sets today! Each of the designers has created something amazing with the new sets, and you will have a chance to hop, check out their creations, AND have a chance to win one of the new sets! For all of the details, please see the ODBD blog. You will find the blog hop list there also! If you have been following the hop, you should be joining me from Sabrina's blog. If not, hop on back to the ODBD blog to begin.

I decided to use all four of the new special edition sets on one creation! I altered a 9x12 canvas for my new craft room/office. It was a lot of fun but the inking got pretty messy! Yes, I inked the entire canvas, and then I Mod Podged it to seal it. It got a little streaky but that added a fun touch to it!
Papers: Webster's Pages Petite Papers Garden Gala & Seaside Retreat
Stamps: Our Daily Bread Designs Scripture Collection 3, Our Daily Bread Designs Scripture Collection 4, Our Daily Bread Designs Ironwork Borders, Our Daily Bread Designs Vine Borders
Stamp Ink: Adirondack denim, Adirondack espresso, Tim Holtz Distress Ink vintage photo
Embellishments: misc. cloth, Basic Grey Archaic buttons, sewing machine, Spellbinders Cross Collection Shapeabilities, Ribbon Retreat satin ribbon, Quickutz Vines, Memory Box 24 Karat pearl stickers, Tim Holtz Distress stickles antique linen, Deluxe Designs scalloped square chipboard, Prima flowers


Well, I hope you are enjoying our big celebration, and congrats to Kelley on 2 years! Praying that you have many more ahead of you!!!

Remember to collect your secret LETTER so that you can spell out the special message. My secret letter is 'D'. :) Now be sure to hop on over to America's blog to see what she created with the new sets! Have fun hopping, and have a blessed day!
Photobucket

Tuesday, January 12, 2010

Tuesday's {Tip} 'To Do' Books

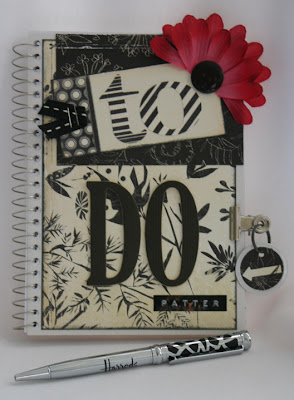
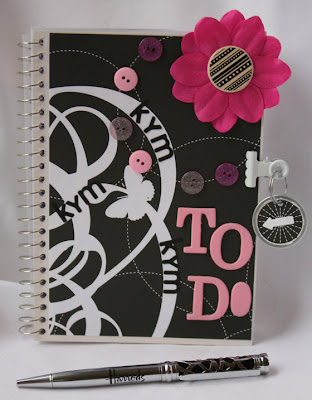
Do you have trouble keeping track of everything on your "to do" list? Well, I know I do. If it's not written down, then it mostly like will not get done. I love my little "to do" book. I have used it for several years, and it still is not full. This thing has a lot of pages in it!

To create my book, I purchased cheap, small spiral notebooks from my local grocery store. They were less than $2 each! I bought several because I make these books as gifts too. Here is my "to do" book followed by the one I made for my sister: The metal clips hold completed pages so that I can flip to the current page quickly. These have truly been helpful in keeping me organized not to mention they are fun to make! If you need to organize those task lists, this might just be the solution for you in 2010! Enjoy!
Photobucket

Friday, January 8, 2010

Organizational {Friday} Die Cuts & More Unit

Most of you know that I have several organizational pieces from Sue of Stampin' Things. Well, I must share my latest piece with you--the Die Cuts and More unit. Once again, I am extremely pleased with this unit! Sue's workmanship and customer service is beyond amazing. I sure wish I was gifted that way but thus I am not. LOL!

This unit works for the following products:

*Quickutz
*Sizzix
*Cuttlebug
*Nestabilities
*Spellbinders
*SU Big Shot products
*Etc., etc., etc.

This unit measures 18"x12"x14", has a swivel base, and hold dies 2"x2" all the way up to the extended 6"x13 3/4". It can hold approximately:

*Up to 60 BigZ and Original Die Cuts plus 11 BigZ XL and Movers and Shapers
*OVER 150+ Sizzlets, Embosslets, and Sizzlets Decorative Strip Dies
*All Cutting Pads (Standard, Extended and Decorative)
*All Spacer Platforms (Standard, Extended and Decorative)
*All Premium Crease Pads, Texturz Pads
*Texturz Plates, Cuttlebug Embossing Folders
*Countless Quickutz dies
*Holds many Nestabilities (when stored in CD cases)

It will also hold BOTH a Big Shot and Cuttlebug on top with dies under them. Here you can see a few Quickutz alpha dies and some Sizzlet dies (both large and small Sizzlets) in the top. And yes, I have tons of room left for a lot more here!
Then here you can see both my BigShot and my Cuttlebug on top of the dies. The dies are hidden just underneath both of my machines. And the cubbies below my machines hold all of my cutting and embossing pads and the big Sizzix Texturz plates. Again, tons of room left to grow here too.

On this side of the unit, I put my Cuttlebug embossing folders. I have them in alphabetical order by design name. I again, have tons of room left. For now I have a jar of miscellaneous buttons and two tins full of WRMK metal alphas. These storage areas here can actually hold a lot of Sizzix dies or Quickutz 4x4 dies. I just do not have that many dies yet so this works great for me and looks pretty in my area. :) I did put some of my Quickutz 4x4 storage binders on here, and they worked beautifully but I already have a different storage area for those. But you could certainly put yours on here. I do not have any of the 4x8 alphas so I could not test those for you.
And on this side, you can see my few Sizzix dies, my Quickutz 12" border dies, and some of my large CM punches. One thing I noticed when I received the unit is that one side is blank. The way the storage areas have to be for the extended dies, etc., I think this side must be built as it is. But don't fear. I found a GREAT solution for the blank side. I altered a KaiserCraft memo board to hang there. I am always needing paper in my craft area so this is perfect!
Board: KaiserCraft Memo Board
Papers: Memory Box Gossamer Flitter & Gossamer Happenstance
Stamp Ink: Adirondack shell pink, SU creamy caramel
Stamp: Memory Box Branch Heart E1310
Paints: Memory Makers rose petal, Smooch vanilla shimmer, Shimmerz angel wings
Embellishments: misc. ribbon, Memory Box baby pink pearls, My Mind's Eye buttons, Bazzill flowers, American Crafts felt flower, Basic Grey dark chocolate chip micro-chip stickers, Mod Podge


You could also use hooks to hang scissors or ribbon, etc. Use your imagination to customize this side as you wish. There are also other blank wood areas around the unit as you can probably see. I talked to Sue, and she said it is not a problem to put nails, hooks, or whatever in those areas to add hanging storage as you wish. Now that's fun! Nothing more fun than expandable and customizable storage!

If you would like to see my post on the other units I have from Stampin' Things, see my post here. I hope you have enjoyed today's post. Be sure to stop by and see what else Sue has at Stampin' Things. You will not be disappointed in any piece you get from her! Blessings to each of you!

Photobucket

Thursday, October 1, 2009

A Little Thursday {Inspiration}

Good morning amazing blog readers! I pray you have had a great week thus far. I know the weather is starting to cool down here, and it is wonderful--mid to high 80's with a nice breeze! Ohh, just love it!

Well, today I wanted to share a couple of my latest creations with you. First up is a layout I created for Layers of Color. I used the Layers of Color Renaissance Hearts stamp set. I just think that set is so elegant. And then I had fun with some Shimmerz by dressing up the chipboard a bit with Celery Shimmerz. This is a 9x9 page, and here is how it all turned out: Papers: Bazzill, Basic Grey Lime Rickey, Fancy Pants Kraft Kuts
Stamps: Layers of Color Renaissance Hearts
Stamp Ink: SU garden green
Alphas: We R Memory Keepers metal alphas, Making Memories Chloe's Closet alpha stickers
Embellishments: Cactus Pink chipboard lace, Scenic Route Save the Date chipboard circle, Heidi Swapp bling circle frame, KaiserCraft rhinestone, Shimmerz celery, hemp from Hobby Lobby


Next is an altered tin I made. I pray a certain mother of mine does not see this before I get it into her hot little hands but if you are reading Mom, stop here please. :) This little tin contains photos of all of my parent's grandchildren. Mom asked for one to keep in her purse so hopefully she will be pleased with how it turned out. I used some of the new Memory Box Dewfrost 6x6 papers along with Coffee Shimmerz on the chipboard and along the edges of the tin to give it an aged look. Papers: Memory Box Dewfrost, Memory Box robin's egg cardstock
Stamp Ink: SU close to cocoa
Paint: Shimmerz coffee, Making Memories shopping bag
Embellishments: Rose Moka brown alphabet stickers, Deluxe Designs chipboard, May Arts ribbon, Prima flowers, misc. buttons, Create Café felt flowers, Making Memories staples


I also created a four-part tutorial for Memory Box when making this tin. If you want to see the complete instructions so that you can make your own, here are all of the pieces to the tutorial.

Altering a Tin Part 1
Altering a Tin Part 2
Pages for Your Altered Tin Part 3
Finishing Your Altered Tin Part 4

I hope you enjoyed today's inspiration. Thanks for stopping by, and have a great Thursday!
Photobucket

Related Posts with Thumbnails