


I came across this adorable card on Splitcoaststampers back in June. I PM'd Sue because I wanted to know how she got such "deep" embossing on her card. She told me that she uses different weights of paper to achieve different looks. Here is what she said:
"Thanks for your email. I always use Beckett Expression Radiance Paper (this is their 80 lb) for embossing because of the beautiful results, but I occasionally use their 130 lb paper for deeper embossing. That is a Sizzix folder and they are more deeply etched than others, so that might also be the difference. This one was the 80 lb."
Now who would have thought--different paper weights. I always focus on matching color and never thought about paper weights. I need to be more mindful of that because I love deep embossing! And look at these two other cards from Sue with great embossing:
Life
Precious One
I hope y'all will give it a try if you haven't already. Enjoy your Tuesday!
Tuesday, August 31, 2010
Tuesday's {Tip} Deep Embossing

Sunday, August 29, 2010
{Scripture Challenge #2} Challenge Word #18, Compassion
Challenge Word #18: Compassion
Are you so caught up in your own struggles or busyness that you fail to see the needs of those around you? Are you sensitive and compassionate towards others or are you selfish? Or on the other end of the spectrum are you feeling as though no one cares or is insensitive to your needs? Do you need some compassion right now? If you feel like that, I am sure there are many around you that feel that way too.
Compassion is meeting people where they are in life, spending time with them, not judging them, and most importantly loving them as God loves them. You can show compassion to anyone even to people you do not know—to the cashier at the grocery store, the bank teller, your postal carrier, a passerby in your neighborhood, anyone! When God brings someone to you whether a stranger or a friend, show them the compassion that Christ showed to everyone around Him. (See Matthew 9:36, 14:14, 15:32, 20:34, Mark 1:41, 6:34, and 8:2.) Today He could be using you to accomplish His task. Are you sensitive to His leading and to those around you? Are you reaching out, meeting people where they are, and touching them? As we look to God in all things, our compassion grows for others. Showing that compassion and unconditional love draws people to Christ! How awesome and amazing is that?
As I shared today’s word with one of my daughter’s, she immediately said "Mom, that reminds me of the song 'Mighty to Save.'" I know God used her in that moment and knew I had to include the first verse of that awesome song which is sung by many artists. The first verse says:
“Mighty to Save”
Everyone needs compassion,
Love that's never failing;
Let mercy fall on me.
Everyone needs forgiveness,
The kindness of a Saviour;
The Hope of nations.
Notice how it starts out “Everyone needs compassion.” Yes, everyone!!! Not just the people you like or the people you have time for but everyone. Over and over the Bible talks about the Lord's compassion. There are too many verses for me to quote them all but just a few include:
Nehemiah 9:17b “. . . But you are a forgiving God, gracious and compassionate, slow to anger and abounding in love.”
Psalm 111:4 “He has caused his wonders to be remembered; the LORD is gracious and compassionate..”
Psalm 116:5 “The LORD is gracious and righteous; our God is full of compassion.”
Psalm 145:9 “The LORD is good to all; He has compassion on all He has made.”
Isaiah 30:18 “Yet the LORD longs to be gracious to you; He rises to show you compassion. For the LORD is a God of justice. Blessed are all who wait for him!”
Lamentation 3:22 “Because of the LORD's great love we are not consumed, for His compassions never fail.”
He is our perfect example thus we need to have compassion for others too. Colossians 3:12 says “Therefore, as God's chosen people, holy and dearly loved, clothe yourselves with compassion, kindness, humility, gentleness and patience.” And 1 Peter 3:8 says “Finally, all of you, live in harmony with one another; be sympathetic, love as brothers, be compassionate and humble.”
For my page this week, I used Memory Box paper and Our Daily Bread Designs stamps. I also pulled out my Copic airbrush system and airbrushed the Martha Stewart lace tags to make them the color I wanted. I think I might need to do that more often. :) The verse I used was the 1 Peter 3:8 verse noted above.
 Papers: Memory Box Jubilee Cherry Picnic, Bazzill cs, Paper Trey Ink kraft cs (used for stamped images)
Stamp Ink: Colorbox Pigment Ink chestnut, Ranger clear ep
Stamps: Our Daily Bread Designs Don't Worry
Embellishments: Martha Stewart lace tags and layered arches border punch, Copic E59 (airbrushed), Ellen Hutson yellow lace, Basic Grey milk chocolate chip alpha, Jenni Bowlin journaling card, KaiserCraft pearls, sewing machine
This week, will you look for someone that needs a listening ear? Will you show that unconditional love and compassion towards them? When sharing your page for this challenge be sure to use Keyword SCRC210 when posting in galleries. Also, please leave a link to your creation here using Inlinkz! To see all of our previous lessons, please visit this post here. I will be back with another study on September 12th. See you then! Blessings,
Saturday, August 28, 2010
Our Daily Bread Designs {Challenge 27}
I usually LOVE distressing my edges with my Making Memories edge distresser so I decided to challenge myself a little more and not use it this time! LOL! Instead, I textured my card by using a Cuttlebug embossing folder. I also added "lumpy embellishments" for texture such as twine, ribbon, a charm, Dew Drops, etc. Then I used a color I don't use too often--purple. The ODBD stamp set I used is the new set called "Don't Worry."

 Papers: Memory Box concord grape nc & lavender cs, Paper Trey Ink cardstock (kraft), 7 Gypsies Conservatory, CM cs (white)
Stamp Ink: Colorbox Pigment Ink chestnut, Ranger clear ep, SU eggplant
Stamp: Our Daily Bread Designs Don't Worry
Embellishments: Cuttlebug Victoria embossing folder, misc. charm, misc. ribbon, Paper Trey Ink rustic twine, Copic BV01, G21, & G40, Dew Drops
If you would like to see more challenge creations, please be sure to check out the other ODBD Challenge Team creations here:
Chris Olsen
Chris Dickinson
Francie Gumprecht
Sabrina Jackson
To see all of the challenge and prize details, please see the ODBD blog post here. Yes, there are prizes, so you don't want to miss the details! Also please don't forget to upload your creations to Mister Linky in the same post by Thursday, September 2, at 8 p.m. EST to be eligible! Remember to use Keyword ODBDSLC27 when posting to online galleries. Thanks for stopping by, and blessings to each of you!
Friday, August 27, 2010
Organizational {Friday} Storing your Printed Photos
Getting Photos Printed
I have used many printing services over the years, and I have also found my favorites. Unfortunately my absolute favorite printing service is "no longer." It was at my local grocery store, and they used the paper I LOVE, they printed them within an hour (most times within minutes), and it was super easy to pick up my printed photos anytime. Now that they have taken the photo printing service out of the store, I have had to resort to my favorite online printers. While I don't mind sending them to an online service, I dislike having to wait for my photos to show up in the mail. But I have thousands of printed photos waiting to be scrapped so I don't know why I don't mind waiting. It's not like I am going to finish my "back log" anytime soon! LOL!!
Anyway, I am very picky about paper and quality. Luckily, I have found two sites that meet my "picky standards." My two favorite online photo services are Mpix and Scrapbook Pictures. Mpix is my favorite service; however, I hear a lot of people prefer my "second favorite."
When receiving my latest order from Mpix, here is what was in my box:

 When you order a large order of prints, they come in this very nice black box. These are perfect for long-term storage of your photos. They are also easy to label, stack, and store! Now, if you order a small amount of prints, they come in these photo-safe envelopes (see it on top of my storage box).
 I love these envelopes. I don't know if it's the sound they make when touched or the texture. They are great, and I have always saved them even when I no longer need them because I might decide to send some photos to someone, and I can reuse the envelopes or I use them for professional photos of the kids that I may not scrap.
Other Storage Options
You may not order a large order of prints to get the nice photo boxes from Mpix; however, there are many other storage options available for your prints. My absolute favorite photos storage boxes are made by Creative Memories. They are called the Power Sort storage boxes.


I think this box has been re-done since I have last purchased them because my boxes hold 2,400 photos and this particular box holds up to 1,200 photos. They also used to have a Mini Power Sort Box which I do not see on their site anymore. My boxes hold 12 removable compartments; the mini holds 3, and it seems the new boxes hold 6. Anyway, regardless, it is still a GREAT photo storage box. I love the removable compartments (they hold 400 photo each) along with the dividers. Makes it easy to take to a crop or keep a small group of photos on your desk! These boxes make it VERY easy to store my photos and find what I am looking for. I actually keep some of these boxes stacked under my craft table. I can see the labels easily on each box, and they are within reach when I want to scrap my photos. These are the particular photos I am working on now.
 I do not have all of my photos sorted this way. When my favorite grocery store printed my photos, I kept them in the photo envelopes with the negatives and/or CD. I then wrote the date and occassion on the front of the envelope, and then I stored them in date order in the dresser unit in my room. I have several drawers of photos like this:
 Of course, there are also photo boxes avilable at Wal-Mart, Target, etc., Regardless of what boxes I use, keeping them by date works best for me.
I hope this has helped a little. I have a LONG way to go in scrapping my photos, and I have a long way to go in getting the drawers of photos into PowerSort boxes. However, what's important to me right now is that I can find what I am looking for, and my photos are safe. Have a blessed Friday everyone!
Thursday, August 26, 2010
{Faith Journaling} Challenge #41
Oh, how I love hymns. They bring such truths to mind anytime of day, anywhere! Plus I love to sing. So today, let's look at:
**Do you have a favorite hymn?
Colossians 3:16 "Let the word of Christ dwell in you richly as you teach and admonish one another with all wisdom, and as you sing psalms, hymns and spiritual songs with gratitude in your hearts to God."
To see all of the journaling questions thus far, please see my post here. Feel free to join in anytime, and thanks for stopping by! Have a blessed Thursday!
Tuesday, August 24, 2010
Tuesday's {Tip} Altering a Notebook
Many of you saw the notebook I made for BSF using Our Daily Bread Designs stamps. Well, I received an e-mail from Eva asking the following:
"What kind of journal or notebook do you buy? I have seen some but they don't have lines in them. What do you recommend? Also, what adhesive do you use? I have found that sometimes they come off after you use the notebook for a while (I attempted one years ago and it did not work very well)."
I then received a few other inquiries, so today I thought I would share how I alter a notebook.
Type of Notebook
The notebooks I use I buy either at Wal-Mart, Target, or my local grocery store. They certainly are nothing fancy. Here is the style I love: 

These notebooks are made by Carolina Pad, and you can see a list of stores that carry their products by clicking here. The artwork on the front varies every single year but I don't buy it for the front artwork since it will be covered up anyway. What I love about this particular notebook is the size (8.6" x 6.5"), the number of lined pages (120 pages), the two-subject plastic taps with a folder pocket in the front, and the fact that they are easy to alter.
Adhesives & Getting it to Stick!
This can be the most frustrating part about altering books--getting things to stick without them falling off years later! I have found a combination of Scor Tape, Mod Podge, sand paper, and a brayer work great for me!  The sandpaper is key to getting it all to stick so please don't forget the sand paper! :) I use a Tim Holtz sanding block but you certainly can use just a plain piece of sandpaper. Here is what I do to alter the notebook:
1. Sand the front of your notebook (sand the back also if you are finishing the back).
2. Wipe off dust with a very damp paper towel and set aside until Step 6.
3. Paint the edges of your notebook with acrylic paint if you don't want the original pattern to show through. I use a very small paint brush to get under the wire. It goes very fast, and I much prefer doing that than taking the wire out! If you notice in my samples below, I don't always paint the edges.
4. Next create the front of your notebook. I create it by sewing and adding all of the flat embellishments before adhering to the notebook.
5. Once the front is complete with the flat embellishments attached (die cuts, sewing, rub-ons, stamps, stickers, etc.), you can adhere it to the notebook.
6. I adhere the front in one of two different ways. I have used both ways. Both hold up, and I like both.
Option 1: Put a thin layer of Mod Podge or Matte Medium on your notebook and on the back of the paper to cover the notebook. Place on cover and use your brayer to make sure the bond is strong!
Option 2: Cover the back of the paper with Scor-Tape. It does take a lot of tape but it is worth it. I have found if you just do the edges, you get too many bubbles when adding the Mod Podge or Matte Medium. Once you have the tape on your paper, put a thin layer of Matte Medium on the notebook and place the paper on top. Use your brayer to make sure the bond is strong!
7. Once you have attached your paper, add a thin layer of Matte Medium on top of the paper to seal it! Let dry. You can add a second layer if you wish but it is not necessary.
8. Once it is dry, attach your lumpy embellishments (buttons, brads, ribbon, Dymo labeler, chipboard, felt, etc.) to finish!
Note: To attach lumpy embellishments, I always use Glossy Accents. That stuff holds up forever. Love it!
Finishing the Back of the Notebook
I like to finish the back of my notebooks too; however, I don't use a lot of my nice papers and of course I don't use any embellishments. I make it match but I make it easy also. :) I add a scrap of paper that matches the front, stamp my name, initial it, and put the date I created the notebook. I adhere it the same way I adhere the front, and I also put a sealing layer of Mod Podge on the back too.
 To see information on my personalized stamp, please see this post here.
Finished Notebooks
Here are just a few of the Carolina Pads I have altered with the first photo being the most recent. Notice how some of the edges are painted and some are left "as is." 


 I hope this has been helpful. Please feel free to ask questions in the comment section, and I will reply there. :) Have a blessed Tuesday!
Saturday, August 21, 2010
Our Daily Bread Designs {Challenge 26}
Well, it's almost time for Bible Study Fellowship (BSF) to start! In fact, I am in San Antonio today at a BSF Area Workshop! :) Each year as we begin a new study, I create a new notebook for my notes. I have years and years of these notebooks in my bookcase filled with amazing notes from studying Scripture. Someday I hope my girls will enjoy them. Anyway, we are studying the Book of Isaiah this year. Today's challenge along with two ODBD stamps sets were perfect for my new BSF Isaiah notebook! I used 4 different dies on this notebook along with 2 different ODBD stamp sets--Scripture Collection 3 and Scripture Collection 4. Notice how I just stamped the names of God on my notebook from these sets. The Cross die I used is also available in the ODBD store here. It's a great one to have on hand!!!


 Papers: Webster's Pages Grace, Basic Grey Bittersweet, Paper Trey Ink kraft
Stamps: Our Daily Bread Designs Scripture Collection 4 (Jesus), Our Daily Bread Designs Scripture Collection 3 (God, Lord)
Stamp Ink: Colorbox Pigment Ink chestnut, SU creamy caramel
Dies: Paper Trey Ink Just the Ticket and Spiral Notebook Page, Spellbinders Cross Collection and Large Labels
Embellishments: Making Memories rose petal paint and brads, Mod Podge, Rose Moka alpha stickers, Jillibean Soup felt flowers, Dymo labeler, Shimmerz Spritz baby's breath, Paper Trey Ink buttns and rustic twine, Deluxe Designs chipboard heart, sewing machine
If you would like to see more challenge creations, please be sure to check out the other ODBD Challenge Team creations here:
Chris Olsen
Chris Dickinson
Francie Gumprecht
Sabrina Jackson
To see all of the challenge and prize details, please see the ODBD blog post here. Yes, there are prizes, so you don't want to miss the details! Also please don't forget to upload your creations to Mister Linky in the same post by Thursday, August 26, at 8 p.m. EST to be eligible! Remember to use Keyword ODBDSLC26 when posting to online galleries. Thanks for stopping by, and blessings to each of you!
Friday, August 20, 2010
Organizational {Friday} Storing Your Photos Digitally
Photographs on Your PC or Laptop
Any photos I take, I immediately download them each day as I take them whether at home or on vacation. When I am on vacation, I not only download them to my laptop daily, I also upload them to my favorite photo site for printing and storage. That way I know my photos are safe before we even head home. If something happens to my memory card, my photos are safe. If something happens to my laptop, my photos are safe. I have done this for years, and it has truly been nice to know my photos are backed up elsewhere! You can read my Tuesday's {Tip} on Managing the Photo Mess here for more information.
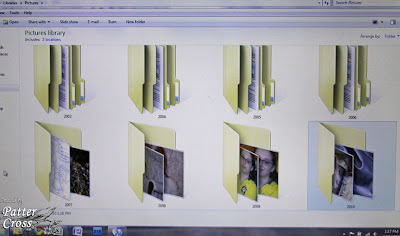
After downloading my photos to my laptop, I organize them into folders in my picture directory. I have "topic folders" and "yearly" folders. Here are some examples of folder names:
**2008
**2009
**2010
**Blog Headers
**BSF
**Design Team Work
**For Sale
**Hobbies
**Scraproom Photos
**Sketches
Next, within a folder, I organize by "event." Sample event names in my 2010 folder include:
**Drivers Permit Day May 25 2010
**Hilton Head August 2010
**Kiwi and Sugar 2010
**Patter's Bday 2010
**Snow Day Feb 23 2010
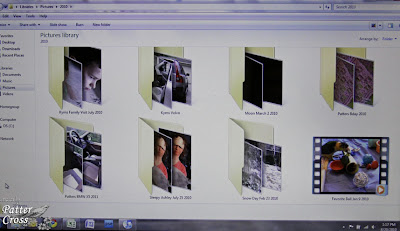 Now for the pets, I just create one folder for the year and put all of their pictures in that one folder each year. That works well for me.
Naming Images for Storage
For the most part, I keep the original name that the camera assigns each photograph. Only for my design team work and a few other things do I change the name. It makes it easier for me to find a particular card or layout by naming the photo the same name as the piece. I also add an "A" to the end of the file name if the photo has been watermarked and resized for the web. For instance, I may have two file names that look like this:
**BeStillCard
**BeStillCardA
The first file name is the original photographed card; I just renamed the file to the name of the card. The second file name means it is watermarked and resized. So, when posting to online galleries, I know I want to grab the "A" file photo--it will be the correct size for the web and have my watermark on it.
I sure hope all of this makes sense. This is almost one of those posts where I need to do a video though I haven't been able to get to that point yet. This digital storage system has been working really well for me since 2003. I can find photos fairly easily unless I forget what year we did something. Eeeek! :) I also backup my photos and files every couple of weeks on my Western Digital external hard drive. The one I have and love can be found at amazon.com here.
I hope this is helpful in managing your digital files. Be sure to check back next time when I share how I manage my printed images! Have a blessed Friday!
Thursday, August 19, 2010
{Faith Journaling} Challenge #40
Well, I am back! Yeah! But it has been a long and rough week to say the least as other things happened this week in addition to the lightning strike. I think I may share in an upcoming Scripture Challenge. :) But for today, can you believe we are on our 40th journaling topic? Wow! Awesome! Are you keeping up? Are you enjoying it? I pray that you are! So today, let's look at:
**Share something that has strengthened your faith.
Isaiah 41:10 "So do not fear, for I am with you; do not be dismayed, for I am your God. I will strengthen you and help you; I will uphold you with my righteous right hand."
To see all of the journaling questions thus far, please see my post here. Feel free to join in anytime, and thanks for stopping by! Have a blessed Thursday!
Tuesday, August 17, 2010
Lightening Strike!!
Last night we had a lightening bolt hit near the house. We had several things go out one of which is our Internet. I am trying to post this short message from my iPhone. It's very difficult to say the least. I will post when I can & email when I can. Everything is out. I would love your prayers please. Thanks everyone & have a blessed Tuesday.
Sunday, August 15, 2010
{Scripture Challenge 2} Challenge Word #17, Prayer
While we were on vacation, God really gave me time to sit and listen to things He wants me to share with each of you. I grabbed my pencil and a notebook and wrote furiously because my mind doesn’t remember things for very long. LOL! Anyway, one thing God gave me was the word “prayer.” I actually posted a study on prayer back in March 2008. You can see that study here. Well, I kept thinking “God, I have already done that study.” However, He had more for me to say so today we are going to look at prayer again, and I also hope you will reference the 2008 study as you read and study on your own. Let’s look at:
Challenge Word #17: Prayer
Have you ever stopped praying because you feel like God has never heard or answered your prayers in the past? Have you given up? Do you feel like He doesn’t hear you? Or maybe you see answer to prayer, have experienced His amazing power, and you want others to have the relationship you have? Or are you somewhere in the middle and you feel like you are on a ‘prayer rollercoaster’? And what is prayer exactly, and how should we go about praying?
First, God knows all things and is intimately familiar with the details of our lives. (See Psalm 139:13-18). Prayer is communication with God and a way believers experience a relationship with Him. Any relationship you have or want to maintain with someone involves communication (both talking and listening). If you have ever lost communication with someone that has moved to a new town, etc., you see that relationship dwindle when the communication is not maintained. Being in prayer and maintaining a relationship with the Lord changes us forever, helps us to know His will for us, and gives us that desire to live for Him each day.
We need to pray because it pleases God, and He loves to answer prayer! Psalm 50:15 says “And call upon me in the day of trouble; I will deliver you, and you will honor me.” And Psalm 147:11 says “the LORD delights in those who fear him, who put their hope in his unfailing love.” He does hear our prayers, and He delights in our fear and reverence of Him. It is a privilege to pray, and it helps us to trust His decisions and desire for our lives.
There is no magic formula to prayer. Sometime during the day you may have a lengthy prayer in your quiet time modeling what is in this study, and other times during the day you will need to shoot up those quick prayer requests. The Holy Spirit will lead you, and the more you pray and develop that relationship, the easier it becomes, and your desire to pray to Him for others and for all things (big and small) will increase. Philippians 4:6 says “Do not be anxious about anything, but in everything, by prayer and petition, with thanksgiving, present your requests to God.” And 1 Timothy 2:1-3 says “I urge, then, first of all, that requests, prayers, intercession and thanksgiving be made for everyone—for kings and all those in authority, that we may live peaceful and quiet lives in all godliness and holiness. This is good, and pleases God our Savior.”
In our prayer time, we need to worship Him and praise Him for who He is. The Book of Psalms is a wonderful place to learn words that describe God (see Psalms 86 and Psalms 145). Pray His attributes back to Him. We need to thank Him for what He has done. And then comes the hard one—we must confess our sins and realize that it is hard to be in His Holy presence with unconfessed sin in our lives. After that, then we can share our specific requests (for ourselves and others) with Him. After you pray, listen for His direction and expect an answer. Psalm 27:14 says “Wait for the LORD; be strong and take heart and wait for the LORD.” But notice the word “wait.” We must wait for His perfect timing and His perfect answer (which doesn’t always line up with our desire). Ask Him to give you a desire to pray powerfully in His name. Jesus is our perfect example of prayer. I encourage you to read John 17 which includes Christ’s prayer for Himself, His Disciples, and for future believers. It is an amazing and encouraging chapter! Praying also gives us that desire to share Him with others. Prayer is a powerful resource. Turn to Him in prayer first in all things!
For my page this week, I had trouble finding a scripture because there were SO many great ones I could have used. I had to control myself even in this lesson because I wanted to reference so many passages! Anyway, I decided to use James 5:13-16 “Is any one of you in trouble? He should pray. Is anyone happy? Let him sing songs of praise. Is any one of you sick? He should call the elders of the church to pray over him and anoint him with oil in the name of the Lord. And the prayer offered in faith will make the sick person well; the Lord will raise him up. If he has sinned, he will be forgiven. Therefore confess your sins to each other and pray for each other so that you may be healed. The prayer of a righteous man is powerful and effective.”
My page uses papers by Pink Paislee. Since my verse was so long, I really loved the Pink Paislee flip notes because I was able to journal that very long passage. And I used a "prayer hands" charm I had but it doesn't show up very well. Oh well! :)
 Papers: Pink Paislee 365 Degrees
Stamp Ink: Memento tuxedo black
Stamp: Provo Craft
Embellishments: Basic Grey Boxer buttons, misc. bakers twine, Pink Paislee 365 Degrees flip notes, Deluxe Designs chipboard flourish, prayer hands charm from A Charming Place, Bazzill alphabet card, felt lace unknown, machine sewing
I pray you leave today’s study knowing that He loves you, He desires a relationship with you, and He delights in spending time with you. He is there. He is listening. He knows every detail of your life. Give it all to Him in prayer. Seek Him, and be blessed as He fills you with His joy and peace. Psalm 62:8 says “Trust in him at all times, O people; pour out your hearts to him, for God is our refuge.” Will you pour out your heart to Him, trust Him, and live for Him?
When sharing your page for this challenge be sure to use Keyword SCRC210 when posting in galleries. Also, please leave a link to your creation here using Inlinkz! To see all of our previous lessons, please visit this post here. I will be back with another study on August 29th. See you then! Blessings,
Saturday, August 14, 2010
Our Daily Bread Designs {Challenge 25}
So, did you participate in the "Triple Challenge" last week? I was away on vacation for 12 days so I missed looking through the creations! But I am home and ready to play and see some great inspiration this week! Your challenge for this week is to "stamp more than once. Use a stamp or part of a stamp more than once on your creation."
I think I have actually done this on my last few creations. I love stamping more than once! So for my card today, I decided to use some fun Memory Box papers along with the "double stamping" by using ODBD stamps of course. :) The ODBD stamps sets I used were For the Graduate and Scripture Collection 3.
 Papers: Memory Box Mistletoe, Paper Trey Ink cs
Stamps: Our Daily Bread Designs For the Graduate, Our Daily Bread Designs Scripture Collection 3
Stamp Ink: Colorbox Fluid Chalk maroon, SU creamy caramel
Embellishments: Spellbinders Labels 4 die, KaiserCraft pearls, SU ribbon, sewing machine, Making Memories bordeaux paint, Shimmerz Spritz, Deluxe Designs chipboard heart, Paper Trey Ink rustic twine and button
If you would like to see more "double-stamped" creations, please be sure to check out the other ODBD Challenge Team creations here:
Chris Olsen
Chris Dickinson
Francie Gumprecht
Sabrina Jackson
To see all of the challenge and prize details, please see the ODBD blog post here. Yes, there are prizes, so you don't want to miss the details! Also please don't forget to upload your creations to Mister Linky in the same post by Thursday, August 18, at 8 p.m. EST to be eligible! Remember to use Keyword ODBDSLC25 when posting to online galleries. Thanks for stopping by, and blessings to each of you!
Thursday, August 12, 2010
What's Going on When?
Sweet Megan of 2Peas asked me to list "what posts when" on my blog. I thought it was a GREAT idea! I have seen many new subscribers, and I thought this might help everyone a bit! Thank you for the idea Megan, and welcome to all of the new subscribers! I am SO glad to have each of you following my blog. I truly have a passion for teaching, sharing, inspiring, etc.! So, here is what generally posts on my blog each week:
Sunday's (bi-monthly): Scripture Challenge
Monday's: Open to any topic or no postings
Tuesday's: Tuesday's {Tip}
Wednesday's: Open to any topic or no postings
Thursday's: Faith Journaling Challenge
Friday's: Organizational {Friday}
Saturday's: Our Daily Bread Designs Challenges
I hope you find this helpful! Feel free to ask questions as you have them, and have a blessed day everyone!
{Faith Journaling} Challenge #39
Though this topic may be difficult, God uses our struggles to grow us and to glorify Himself. Let's journal about:
**What has challenged your faith?
Romans 15:30 "I urge you, brothers, by our Lord Jesus Christ and by the love of the Spirit, to join me in my struggle by praying to God for me."
To see all of the journaling questions thus far, please see my post here. Feel free to join in anytime, and thanks for stopping by! Have a blessed Thursday!
Tuesday, August 10, 2010
Tuesday's {Tip} A Different Resource for Supplies
Most of you know I have two parrots--my precious girls, Kiwi and Sugar. Well, I am finding that some of the things I order for them would work perfectly for papercrafting! Yes, you may think I am nuts but they work! Here are some great items I have purchased that I thought you might enjoy.
This colorful paper string would be perfect in buttons, tying around things, etc. You get all of this for $2.25! It's great paper string!
These small, leather butterflies would be adorable on any creation. They are just $0.30 each! There are also leather stars and leather hearts available for the same price.
And the tiny pacifiers and safety pins would be perfect on any baby card or layout!
Ann at California Bird Nerds even has a whole Baby Shower section because some of these goodies would make great baby shower fun! If you are hosting a baby shower, you definitely want to check these goodies out!
And now I leave you with the latest photos of my girls--Kiwi wrapped up in adding machine paper, Sugar after attacking a few strawberries for dinner, and finally "Kissin' sisters." I hope you enjoy. Blessings! 


Monday, August 9, 2010
More For Sale: Vera Bradley
Well, I have some brand new Vera Bradley pieces that I have decided to sell instead of what I had intended to do with them. I may also be selling some other bags and pieces (Coach, Vera Bradley, etc.). I will keep a link in the sidebar so that you can access it easily as I update. This will be the only "official" post so you will need to check back for updates in the sidebar. :) Please note shipping will be combine to the cheapest possible when buying multiple items. Here is what I have (updated 3/15/2011):
Coach Pink Bag, Like New (approx. 12" x 6" x 4") $20 plus actual shipping
**Note straps short and barely fit over a small shoulder. Bay Hobo, Black Microfiber, Brand New, Retired, $49 plus actual shipping
  Tie Front Tote, Espresso Microfiber, Brand New, Retired (12 1/2” x 14” x 6”) $59 plus actual shipping
  Tie Tote, Mod Floral Pink, Brand New, Retired (14" X 10 1/2" X 4 1/2") $35 plus actual shipping
  On the Go Tote, Loves Me, Brand New (11" x 8 3/4" x 4 1/4") $35 plus actual shipping
 On the Go Tote, Puccini, Brand New (11" x 8 3/4" x 4 1/4") $35 plus actual shipping
 Pinwheel Pink All-in-One Wristlet, Brand New, $23 plus actual shipping
 Call Me Coral Hipster, Brand New, Retired, $35 plus actual shipping
 Please e-mail me with anything you might be interested in. I can only mail within the U.S. I am so sorry about that but my crazy schedule just doesn't allow me to get to the P.O. to fill out international forms. I accept PayPal of all kinds, and you will not be charged the fee that I "will eat." LOL! I have also put a link in the sidebar for you to reference this post easily, and don't forget about my other "for sale" post of scrappy/stamping items you can find here. Thanks for looking, and have a blessed day!


