Showing posts with label Tuesday's Tip. Show all posts

Sunday, April 28, 2019

Recycle Those Bottles

Recently I have finished off two bottles that now work perfectly for my arts and crafts. One used to be a Dermalogica facial toner bottle, and the other one was a bottle of hand sanitizer. Let's look at them both.

Facial Toner Bottle
First, this bottle delivers a beautiful mist when sprayed. I have always loved it. So, I knew that once it was empty that I would keep this bottle. It was very easy to clean once I was done with the bottle but the label left a lot of adhesive that was just awful. The adhesive went all the way around the bottle. I was not about to spend a lot of time using Goo Gone to get it off. So, my solution was to use a bit of paint for fun. The paint covered the adhesive, and then I added a thin layer of matte medium on top to seal. Now it not only works as an amazing water bottle on my table, it looks cute too!


Hand Sanitizer Bottle
Most hand sanitizer bottles are either tiny or rather big. This one is inbetween, and I got it from Bath and Body Works several years ago. I knew this bottle would be perfect for "matte medium on the go" or to even keep on my table instead of my large bottle which takes up a bit of room. It squirts out very nicely, and it will pack very easily in my travel bag too. Perfect!

So, start looking at those used bottles. How can they be recycled for your arts and crafts? Consider that before tossing them in the recycle bin. Thanks for stopping by, and have a blessed week!

Saturday, August 4, 2018

Want a Never-ending Date Stamp?

Just a quick Saturday tip that I wanted to share with you. Do you want to stamp a date that is from June 6, 1908? Or maybe from 1965? Or even what about 1994? Your date stamp probably does not go back that far. Well, locally I purchased this 8-band number stamp. It works amazing, and you can create any date you like. You can also use it for scripture addresses. The only problem is that you have to write in the /, -, or dot between the numbers. But for me to have a never-ending dater and versatile stamp like this, it's worth that little minor hiccup.

Here you can see 10:22 was stamped with this stamp also. Love it!

As I said, I purchased mine locally but amazon has one slightly smaller than mine that you can find here. Hope you like my tip for today. Enjoy!

Friday, December 29, 2017

{Tip} Craft Sheets

Oh my word, I saw a post on Instagram this morning by my friend Dani. She created something fun with Copic inks. Look here to see her post. Anyway, as I looked at her creation, I noticed it was sitting on a craft sheet ON a clipboard. Ingenious! For crops and teaching classes, this is perfect. So, I grabbed my four pack of craft sheets, and I immediately created my own travel clipboard craft sheet. Thankfully I also had a spare, cheap clipboard sitting in my room too.


The craft sheets I use are so much cheaper than the Tim Holtz craft sheet. I purchased this box of four craft sheets from Amazon a year and a half ago. Click here to see them. They work great, and because they are inexpensive, I didn't mind cutting this one up. Thanks Dani for the great tip. Can't wait to use this. Have a blessed day everyone!

Thursday, November 24, 2016

Happy Thanksgiving and iPhone Wallpaper

You are probably wondering how Thanksgiving and iPhone wallpaper go together. Well, they don't really but I have spent my Thanksgiving day in my studio painting and having fun. We had a late meal (at 5 p.m.), and now it's back to the studio to post this and just relax.

First, I pray your day has been wonderful and that you have been blessed by spending it with those most precious to you. And for those that might find these days stressful being together with some in your life, I pray you still enjoyed these moments. Look for the blessings in your day and be thankful.

I know for me, spending time in my studio is a huge blessing. And I did something fun with my art today. I photographed it like I always do but then I decided to make it the wallpaper for my iPhone and my iPad. How fun is that? You can do that too with any piece you create! Photograph your piece whether a layout, art journal page, card, anything and make it your wallpaper. You could change it often too if you wanted. How about a scrapbook page of your kids or grandkids. Wouldn't that be fun to see each time your phone lights up? Anyway, here is how mine turned out.

I hope you have enjoyed this little tip. Have a blessed and safe weekend! Happy Thanksgiving, and I am thankful for each of you! Blessings,

Thursday, November 17, 2016

Art {Journaling} No Waste!

Do you find when you create that you have left over paint? How about left over ink on a stamp? And what about left over modeling paste? No problem! How about keeping an old book and a journal nearby. That's what I do. I then add the leftover paint, ink, etc., to the pages. I also add it to deli paper. All of these pieces then give me a place to start when I start a new page instead of the page being blank. It also gives me great papers to use for collage, Bible Journaling, or to cover other pieces. Here are a few examples:

And here is how I used the above page to cover an ICAD. This ICAD is not complete yet but it will go very quickly once I use this particular card.

And some more pages I can use for future work:


I do not prep the pages in the journal with gesso. I just add whatever paint or ink is left over and add it directly to the page.

Now what about that left over modeling paste? It can really be messy. Sometimes I add it to a journal page, and sometimes I add it to other papers such as these used paper bags. I can then add them to journal pages or any creation in the future. The paste is dry and ready to go when I want to use it.

I hope this has been helpful. Grab a book and a journal and start adding your leftovers to them! Have fun!

Product List (click product tags for more information)

View blog post for supplies


Tuesday, February 23, 2016

Tuesday's {Tip} Preventing Bleed Through

Some of you may have noticed on my recent Art {Journaling} pages that I have been using washi tape down the center of the page. Here are some examples, and note the page on the far right has not been posted yet. Be watching for it this week. :)

So, why do I do this? I do it for two reasons. One, for decoration, and two, to prevent paint from bleeding through the seams to the other pages. Ask me how I know that happens. :) Yes, in my newest journal, it has happened a few times so I decided to include washi tape as part of each page. Then yesterday as I was looking through Pinterest, I noticed that Julie Fei-Fan Balzer uses masking tape and gesso for the same reason. You can see her post by clicking here. I have never used her method but am doing it on a page I am working on now. I like the option to use just masking tape and gesso when I don't want a decorative washi tape down the middle.

I have done a lot of single art journal pages and even used spiral bound journals in the past. When using either of those to art journal, I don't have this problem; however, with the Dylusions Small Creative Journal, I do. But I must say it is my favorite, favorite journal. So having to use washi or masking tape doesn't bother me at all. It's part of the fun process. Even if you don't have paint coming through the seams, you can certainly use a bit of washi for fun!

I hope you have found this helpful. Enjoy your Tuesday!

Tuesday, February 9, 2016

Tuesday's {Tip} Clogged Mist Bottle?

How many times have you had bottles of mist that clog? I can't even count there have been so many. Some I can unclog rather easily, and others I can never fix. So, what do you do with the misting bottles that can't be unclogged? Today I wanted to show you my solution.

I love Mini Mister bottles. I have yet to clog one of these. :) For the bottles that seam to be permanently clogged, I pour a bit of the product into a Mini Mister. Then I use a rubber band to keep it with the original bottle and store in my drawer. This way I can continue to use the product, and I don't have to worry about an annoying clog. Yes, it costs me more to have another bottle; however, I have many of these on hand. I also rinse them out and use for other things if I don't need them permanently for something.

I hope this simple solution has been helpful. Have a great Tuesday!

Product List (click product tags for more information)
View blog post for supplies

Tuesday, February 2, 2016

Tuesday's {Tip} Mixed Media Paper Scraps

In my past couple of Art {Journaling} posts, I mentioned that I used some scrap painted deli paper. Today, I thought I would share how I store my stash of mixed media scraps. I do use them a lot so this bag is always nearby. Also, if you want to know more about deli paper, see my post here.

Storing my scraps is very easy. I just throw them in this bag. Unfortunately, I do not remember where I purchased the bag in the photo. But it doesn't matter because I have a few other bags I prefer and use now. They are called the "See Your Stuff Bags." They come in all sorts of sizes and colors, and even the larger bags have a handle. I have linked them for you in the product list below.


The bag stands on a shelf right next to my art journaling table. It is easy for me to grab what I need and use on a page. I use these mixed media scraps a lot so the bag never really gets too full. I definitely use these scraps more than I used to use my scrapbook scraps.

I hope this has been helpful. Have a great Tuesday!

Product List (click product tags for more information)

View blog post for supplies

Friday, December 18, 2015

Need Tags?

Today I wanted to share with you some tags I use all of the time. I had never thought of sharing this before but after showing my mom, I thought that y'all might like to see them too.

About 1 1/2 years ago, I purchased a box of Avery Shipping Tags. They measure 2.75" x 1.375". When I purchased them, I didn't realize just how handy they would be. I use them for everything! If you have ever received a package from me, you have probably gotten one of these cute tags. I always stamp my name on it, write a little something, and attach it with washi tape. It's so easy and quick to use these tags plus they are cute. I even used them on Christmas gift bags using Tim Holtz Scribbly Christmas stamp set. They turned out cute also.


Now, these tags come in a box of 1,000 but as I said, I use them for everything including my layouts and creations. Maybe you live near someone that might like to split the box with you. The stamp shown above is from The Stampin Place. They have a lot of amazing stamps!

Hope you have found this helpful. Have a blessed and Merry Christmas!

Product List (click product tags for more information)

View blog post for supplies


Tuesday, September 15, 2015

Text Blocks for {Journaling} Bible

Today I thought we would talk about creating text blocks. Angela posted this comment on Sunday's post:

"I love how you do the text blocks. Do you print each word out as you need them or do you keep a stash of suitable words in different styles and fonts?"

First, I do not keep a stash of words. I basically find them or create them as I create my page. And to help give you an idea of how I create them, I thought I would share a few ideas with you. Let's get started.

Letter Stickers
I use letter stickers a lot. I almost always stick them to a piece of paper first so that I can either stitch on them (as I did with the word 'witness'), make sure the spacing is correct, or even cut them down. I did cut down each sticker in the word 'humility'. It was too wide to fit in the margin so I cut down the letters to make them thinner. There is almost always a wide margin on letter stickers so it's easy to change their size. You can also create fun backgrounds for your words by sticking them to a piece of paper first. You can see what I did differently with the word 'me' below.

Stamps
I use stamps on every single Journaling Bible page. I have several sets that are my "go to" sets that I love. Again, I generally stamp on another piece of paper first so I can stitch or create a fun background. I also use tickets. They are really fun to use on pages.

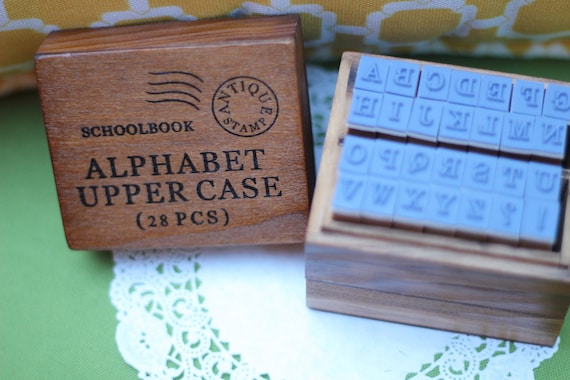
Some of my favorite alpha stamp sets that I use are the following sets:

*Upper and Lowercase Alpha sets from etsy.com. There are many sellers that have these sets.

*Provo Craft Rolling Stamp sets. I have had these for many, many years but I am sure you can find them on eBay or various places.

Typewriter
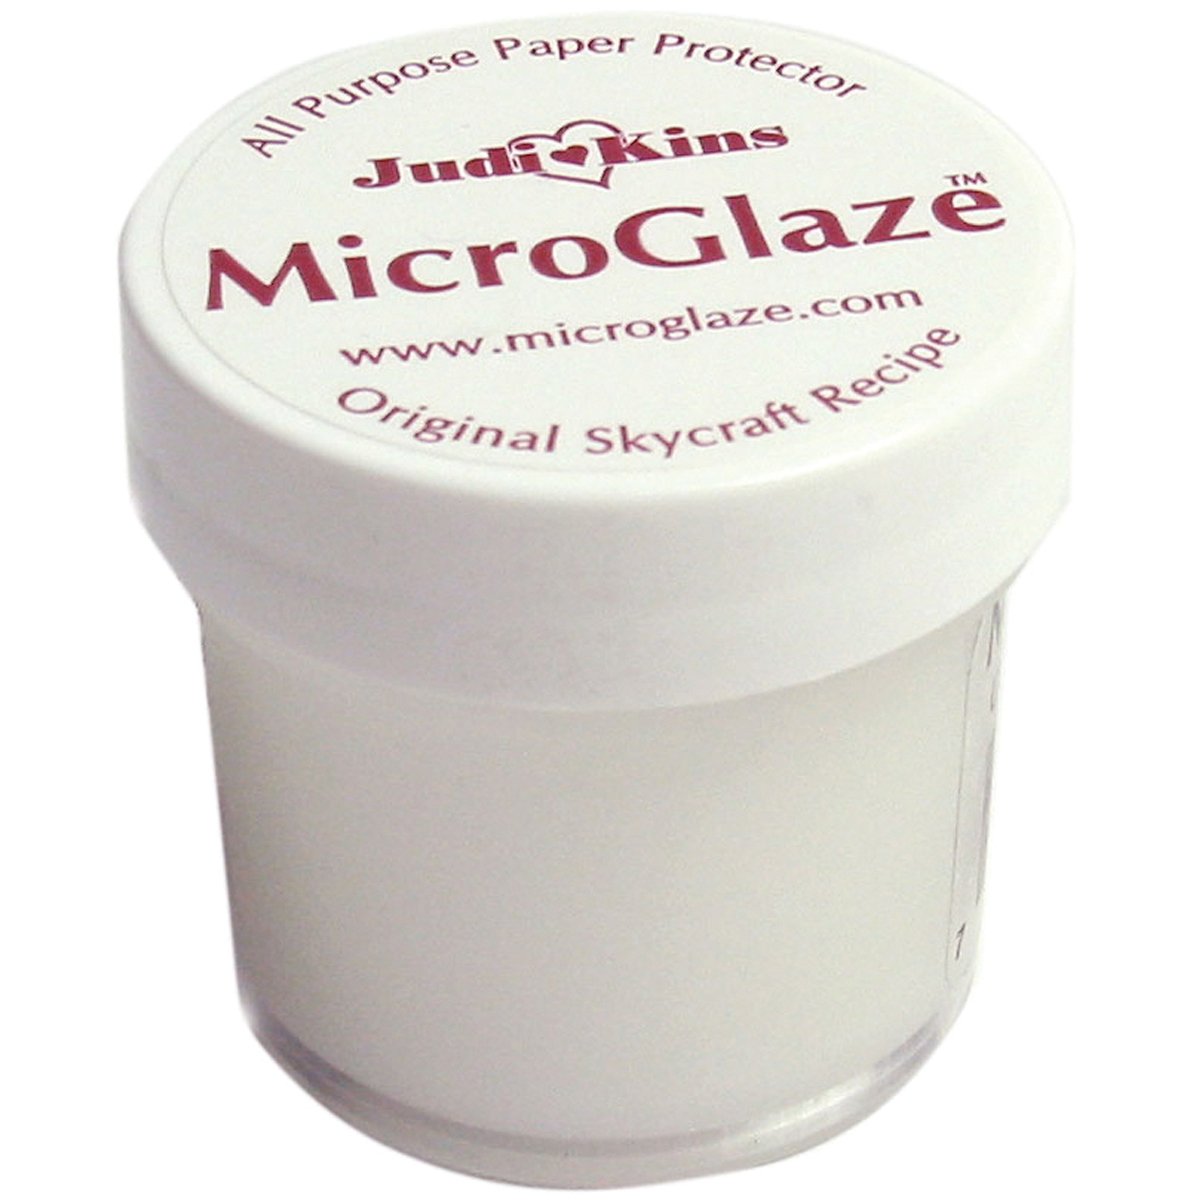
I have a 1960's Smith-Corona typewriter that sits on my craft table. I just love it, and I use it a lot. I type on everything from deli paper, hymn paper, ledger paper, stickers (see how I typed the word 'blotted out' on the tag sticker below), or anything else I can find. I do use Judikins Microglaze once I type the letters so that it becomes waterproof. For more information, see my link about Microglaze below.

Helpful Links
I have posted about how I have specifically created some of these text boxes. I will link them here if you want to see those posts also.

*EnvelopesSee how I stamped the word 'trust' in this post here about using envelopes for texture.

*Deli PaperSee how I stamped the word 'wait' on deli paper in this post here. Deli paper makes a great hidden background.

*MicroglazeLearn more about how I use it in this post here.

Other Products
There are plenty of word and alpha stickers available on the market. I will link what I can at the bottom of this post. Some of my favorites are:

*Tim Holtz Chit Chat StickersI almost always outline these for fun.

*My Mind's Eye Tiny Alpha StickersThey have many colors and varieties. I keep all colors on hand and use them a lot. They also have a few words available in each set.

*Simple Stories Alpha StickersMore great letter stickers that come in a lot of colors and work great for Journaling Bible pages. I used these stickers for the word 'Christ' above.

*Papers UsedI use old book paper, deli paper, newsprint paper, hymn paper, etc. to add letters, typing, and stamping.

I hope you have found this post helpful. Have fun finding ways to create unique text boxes for your pages. Enjoy, and thanks for stopping by!

Product List (click product tags for more information)

View blog post for supplies


Tuesday, August 11, 2015

Tuesday's {Tip} Large Date Stamp

Today I wanted to share my new, large date stamp. On one of the message boards I belong to, a thread was started about a new mega date stamp that Studio Calico released. Some of the board members found one similar on amazon. I loved it, and it just arrived yesterday. Here is the new stamp in comparison to the Becky Higgins date stamp:

Isn't it fun? The entire stamp from handle to bottom is 6". The date is 1/2" high and 2 1/2" wide. I really like it. It was $30; however, the dates run through 2026. I will certainly have fun using this on my creations. You can find it on amazon by clicking here.

Thanks for stopping by, and have a blessed week!

Tuesday, May 19, 2015

Tuesday's {Tip} Photographing Your Work

In April 2013, I posted about photographing your work using a Cowboy Studio. I love my Cowboy Studio, and I still use it. However, I have found something else I love, and I thought I would share it with you. Click here to see my post using the Cowboy Studio.

Now let's look at my newest find. I was searching etsy one day, and I came across vinyl photography backdrops. These can be cut into huge sizes or you can buy 2 ft. x 2 ft. samples which is what I purchased. I actually purchased the Grungy Barn Wall color from SwankyPrints. I purchased a few other colors too but this is my favorite. 

I lay this on the floor, put my piece down, then stand over the top to photograph. Most of my photos have been taken this way for the past 2 months or so. You can see the vinyl in this photo:

Doesn't it give a nice background? To store, I just roll it back up and put into the mailing tube it came in. I then stand the tube in a corner of my room. Easy and inexpensive. The vinyl runs about $10 a sheet. Not bad!

Hope you find this helpful. Enjoy your Tuesday. Blessings,

Tuesday, May 5, 2015

Tuesday's {Tip} Coloring and Blank Color Charts

I have been preparing my craft bag to take to the hospital when my daughter has her 3rd spinal surgery since October 2014. She will be in the hospital for at least 4 days, and then she may have to go to a rehab center. I plan on staying with her the entire time she is in the hospital. So, I plan on coloring and watercoloring. These are very easy to travel with and will give me something to do besides just reading.

I have enjoyed coloring since I was tiny. In fact, the night before I got married, my sister and I sat at my grandmother's kitchen counter and colored the evening away. We had a very small, private wedding with only 9 people in attendance so we had a very quiet evening the night before the wedding. Anyway, it seems others have now rediscovered their love of coloring. Mine has never left but I have purchased a few new books. The popular books that you might see right now are "Secret Garden" and "Enchanted Forest" by Johanna Basford. I do think the books look beautiful but the images are too intricate for my "almost 50" year old eyes. So I purchased these:

I am working on the Jenean Morrison book and love it. My daughter has been working on the Brynn Summers book and is really enjoying it. It has kept her mind off of her upcoming surgery. I purchased all of these at amazon.com. Jenean Morrison has several different books available so you might want to look at what else she has. One note about the "Glorious Gardens" book. There are images on both sides of the page like a children's coloring book so you would not be able to use any wet media in this book. The other books just have an image on one side of the paper. If you would like some free coloring pages, you can download five of the Secret Garden pages by clicking here.

To color the pages, I have been using my Peerless Watercolors and also my Lyra Polycolor pencils. Click here to see more information on the Peerless Watercolors. I do not have a color chart for my colored pencils and really want to take one with me to the hospital. So, I searched the web and ran across several blank color charts by Denise Howard. She has blank color charts for Prismacolor, Caran d'Ache, Faber-Castell, Derwent, and Lyra pencils available in a pdf format for you to print. They are wonderful. Click here to download and print any that you need. Here is mine:

I hope this has been helpful, and have fun coloring!

Thursday, January 22, 2015

Tool for Your {Journaling Bible} and Other Creations!

Today I wanted to share with you a new tool I purchased. It has been around but I never thought that I would be interested in using it. I have a Copic Airbrush so why would I need this and would it work with my Copics? I am here to say "Yes, I need this, and yes, it works with my Copics." I am in love. So what is this tool? It is the Tim Holtz Distress Marker Spritzer.
I experimented a bit with it to see how it would work with my Copics. You need to remove the adjustable marker insert so that a Copic Sketch marker will work. I misted a piece of printer paper with the broad tip of the Sketch marker and the brush tip. You can see the different effects below. I also used a stencil on the tag to see how it would work, and it was great. 

I tried it in my Journaling Bible too as the mist is soft, and it worked beautifully. There was a tiny bit of bleed through from the "splotch" on the bottom right corner but not even enough to photograph for you. I will definitely be using this in my Journaling Bible.
Now a darker color would probably bleed through more. The color I used here was Copic RV55. I hope you have found this helpful. It is on sale at Joann's this week. The link is below. Have a blessed Thursday!


View blog post for supplies

Tuesday, December 16, 2014

Tuesday's {Tip} Smearing Text? Try Microglaze!

Do you ever find that your printed text smears? Or how about stamped images? Do you find when you art journal that you have text that smears? It can be written text, printed text, or even stamped images. One way to solve the written text problem is to only use waterproof pens. Some that I use and love are:
  • Copic Multiliner SP 0.5 and 0.7
  • Staedtler Pigment Liner 0.5 and 0.7
  • Sakura Pigma Micron 0.5
To keep stamped images from smearing, you can use india ink. I love and use Hero Arts Hero Hues Black India Ink. But if you notice, it is only in black. What if you want to use a colored ink that will smear? Or what if you have printed text from your printer? If you saw my post on Sunday, the text on the ATC cards was printed from my printer. That text smears if I get it damp or put any other wet media on top of it (for instance mist or splattering paint).

Sometimes for my printed text, I will use my vintage Smith-Corona typewriter but even that text will smear with other wet media. So, how do I solve that problem and protect my text and images? I use Judikins MicroGlaze. 

This stuff is awesome. You just dip your finger into the jar, and rub a tiny bit over your text. I then buff it with a cloth. Simple and fast. Here is what this product does:
  • Micro glaze is an all-purpose paper protective cream wax coating for paper and art 
  • Apply this glaze sparingly over artwork for a smudge resistant and waterproof finish 
  • Repels water from inkjet photos watercolors and stamped cards 
  • Can be buffed to a gloss and acid free 
I really love this stuff. You can also use it as a resist. There are lots of cool resist techniques to do with MicroGlaze. Look for videos on YouTube.

Thanks for stopping by, and I hope you find you love MicroGlaze as much as I do! Blessings,

Product List (click product tags for more info)
View blog post for supplies

Related Posts with Thumbnails