I am a Christian, wife of 35 years to an amazing man, and mom to adult identical triplet girls. I came to know Christ through Bible Study Fellowship (BSF), and it is a ministry near and dear to my heart. I was in leadership at BSF for 14 years as a Substitute Teaching Leader, Group Leader, Children's Leader, and Class Secretary. I am also a certified childbirth educator and infant massage instructor. Besides having a passion for the Lord and sharing Him with others, I am also passionate for art, and I love to help and share with other paper crafters and artists. I enjoy doing cross stitch, sewing, layouts of all sizes, art journaling, cards, mixed media, ATCs, altered art, etc. I love it all!
In accordance with FTC16CFR, Part 255, I declare that I currently receive or have received free products or am paid a fee to promote and endorse for free from the following companies: Canvas Corp Brands, Memory Box Co., Blue Fern Studios, Our Daily Bread Designs, Spellbinders Paper Arts, Stampin' Things, and Scrapbook.com. These companies generously supply me with complimentary products and/or a paid fee for promotional purposes. My enthusiasm in promoting their products does not stem from the fact that I am compensated by them, but because I truly love their products and feel their product lines and services to be superior in this industry.
The other day I shared iw5.11.16, and today I am sharing iw4.27.16. It may seem like I am working backwards but I am not. I just pick and choose the lesson I feel like working on. I think it depends on my mood. So, for today I am sharing my creation from one of April's Inspiration Wednesday videos. I think this page and the first page of this journal were my favorite to do. The techniques were so fun, and I just loved creating this. This particular page uses several older things like an old Bazzill card (remember those), very old rub-ons, etc. The words I chose to use on this page are: passion, create, and inspire. I chose those because I have a passion for creating and inspiring others. Perfect. I was so glad those words were in that old rub-on set.
Papers: misc. book paper Stamps: Illustrated Faith date stamp Stamp Ink: Hero Hues India ink black Paints: Golden Fluid Acrylic Paynes Gray, Quinacridone Magenta, Quinacridone Nickel Azo Gold; Liquitex Light Modeling Paste; Apple Barrel white; Ranger Multi Medium Matte Tools: Stencil Girl Illegible, Donna Downey Mini Numbers Repeat stencil, Stabilo All pencil, waterbrush, Ranger Mini Mister, The Crafter's Workshop Basic Template circles, palette knife Embellishments: Kaisercraft Inspiration rub-ons, Bazzill tag
Thanks for stopping by. I hope you enjoyed it, and pull out some of that old stash to create something fun.
Product List (click product tags for more information)
I finished another Inspiration Wednesday, and I wanted to share it with you today. On this journal spread, Donna Downey used a word on the insert so I chose the word 'hope' from Psalm 31:24 which says:
Psalm 31:24 "Be strong and take heart,
all you who hope in the Lord."
For these pages, I used really, really old MAMBI scrapbook paper and old alpha stickers. I also used a butterfly die that I have not used in a long time. This was a great spread for using really old stash. I actually need to do it more often.
Papers: Canvas Corp. Blue and Ivory Dot Reverse, 7 Dots Studio 9th Wave Elements, MAMBI patterned paper Stamps: Provo Craft alpha, Illustrated Faith date stamp Stamp Ink: Hero Hues India ink black, Archival potting soil Paints: Art Basics Soft Matte Gel Transparent, Golden Acrylic Glazing Liquid Satin, Golden Quinacridone Nickel Azo Gold, Ranger Multi Medium Matte, Dr. Ph. Martin's Bombay India ink brown, Art Anthology patience Tools: Cheery Lynn Designs Exotic Butterfly die, brayer, Tim Holtz sanding block and tiny attacher, Ranger blending tool, Pigma Micron 0.3 black pen, sewing machine Embellishments: misc. postage stamps, Simply Luxe alpha stickers
Thanks for stopping by. Have a great week.
Product List (click product tags for more information)
Yes, it's Sunday. Yes, I am posting a Friday post on Sunday. But, we just got back from a glorious 1 1/2 week vacation. And today I wanted to share with you what I took along and how I was able to create during our vacation time. First, I knew I wanted to take an art bag. While I have tried to put together art bags in the past, I never liked what I came up with. Well, I think I finally found what I love, and I used daily on our trip.
The Bag
I purchased a Vera Bradley Large Blush and Brush makeup bag from eBay. This bag retails for $52 but have seen it from about $28 so be sure to watch the prices if you look for one. It has lots of pockets and then even pockets for brushes (see pictures below). This bag is perfect for your projects, and easy to take along with you.
Contents
So, what did I put in this bag? Well, my thought was to journal and watercolor so that dictated what I decided to put inside for this trip. So, here is what I packed in this wonderful bag.
Global Art Materials 5-1/2-Inch by 5-1/2-Inch Drawing Book
(15) 5x5 printed coloring pages
Scrap paper
Glue stick
Tape runner
Scissors
Faber-Castel Clic and Go Collapsible cup (not pictured)
The coloring sheets I took with me were ones I printed for free from the web. Most are from Alisa Burke as I love her style. I put the images into a Microsoft Word document, resized, and printed two to a landscape page onto regular printer paper. Once printed, I trimmed to 5x5. To see some of the pages I used, feel free to look at my Pinterest Coloring Pins by clicking here.
To store the coloring sheets, I just put them inside the journal. They fit nicely. And because the elastic band keeps the journal closed, the papers did not fall out or get bent in my travel art bag.
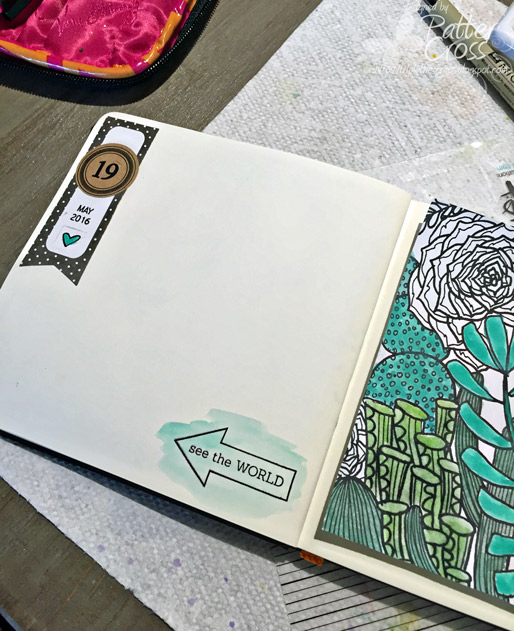
My Creations
Here are a few of my pages from our trip. This journal allowed me to have fun with art while I was gone while also journaling about our trip. To paint and color my pages, I used this video from Alisa Burke as inspiration.
Thanks for joining me, and as always, let me know if you have questions in the comment section. I will answer there. I would also love to know what you think. And I hope you have fun packing your own travel art bag! Have a blessed week ahead everyone!
Happy Mother's Day Weekend sweet blog readers! I am posting the May study a day early. I thought that if some of you had time to yourselves on Mother's Day or even today, that you might enjoy this study as a time for renewal and to prepare for the week ahead. Enjoy!
The Study
This past Tuesday as I was driving, I heard this on KLOVE:
"Worrying about tomorrow robs today of its strength."
And I would add to that that worry robs us of today's joy. I immediately thought how perfect that was for my girls as they had final exams this past week. We also lost one of our precious dogs this week suddenly and unexpectedly. After I had written most of this post, I realized God did not want me to worry about how or when to tell our girls. He gave me the words, the perfect timing, and has comforted us all. I also realized that each of you also have a lot going on in your lives—end of school year craziness, job difficulties, family issues, or maybe you too just needed this reminder.
So, what is worry? Well, dictionary.com says "to torment oneself with or suffer from disturbing thoughts; fret." When I look at that definition, it is perfect. When we worry about something, we are tormenting ourselves instead of experiencing the joy that God may have for us at that moment. When we worry about something, we are suffering from disturbing thoughts. Have you ever worried about something so wonderful that it wasn't disturbing? I doubt it. In that case, we would be looking forward to it with great expectation instead of it being disturbing. When we worry about something, we fret or become eaten away by the subject of our worry. We become bound to that worry, and it eats us up. God does not want us to be chained down by worry and fear. He died so that we might be free from that. Listen to this song by Lauren Daigle called "How Can It Be."
Chorus
"You plead my cause You right my wrongs You break my chains You overcome You gave Your life To give me mine You say that I am free How can it be How can it be"
Give your worries and your fears to Him so that you can be free from the chains of worry and experience the strength and joy of the day He has given you today! He tells us to pray, give our worries to Him, and we will then experience His peace.
Philippians 4:6-7 "Do not be anxious about anything, but in every situation, by prayer and petition, with thanksgiving, present your requests to God. And the peace of God, which transcends all understanding, will guard your hearts and your minds in Christ Jesus."
The Life Application Study Bible says this about Philippians 4:6-7 "Imagine never being anxious about anything. It seems like an impossibility. We all have worries on the job, in our homes, at school. But Paul's advice is to turn our worries into prayers. Do you want to worry less? Then pray more! Whenever you start to worry, stop and pray!"
So perfect—pray, and I would add to that to listen during that time of prayer too. As I began to worry about what to tell our girls about our precious pup's passing, I turned to prayer. In that quiet moment, God told me exactly what to tell our girls. It was perfect, and as I shared the words He gave me, they were comforted. If I would have continued to give into worry and fretting over what to say, how to say it, when to say it, I would have missed the beautiful words He had for all of us. So, don't miss out on the joy, comfort, and strength He has waiting for you by worrying and fretting. Turn to Him!
Matthew 6:34 "Therefore do not worry about tomorrow, for tomorrow will worry about itself. Each day has enough trouble of its own."
Luke 12:25 "Who of you by worrying can add a single hour to your life?"
The Art
Because I have not done a Bible Journaling page in quite some time and because I love this quote so much, I decided to put it in my Bible with the Luke 12:25 verse.
Papers: misc. book paper
Stamps: Ali Edwards Heart Story, Technique Tuesday Say it to Remember and Everyday Words
Stamp Ink: Archival Ink jet black
Paints: Kurtake watercolors, Dylusions paint fresh lime, Folk Art wicker white, Golden Open Acrylic teal
Embellishments: Illustrated Faith Say It Colorful and Banners stickers, Jillibean Soup birthday bisque mini alpha, Tim Holtz Chit Chat stickers
Feel free to join us on the Facebook page where some people will be sharing their creations. We also have some discussions that will be going on there too about the study. If you don't use Facebook and want to share your creation here, do so below by using Inlinkz! To see all of the information regarding this challenge and the previous studies and art tips, please see this post here. Have a relaxing Mother's Day!
Finally my stencils are organized in a way that I think will stick for many years. In the past, I have had them hanging from my large Simply Renee Clip it Up along with other things. Then I moved them to a box that sat on my art table. I did not care for the box so I began looking at moving them back to a Clip it Up but this time to a Mini Clip it Up. Unfortunately, this product is no longer available but many of you have them stashed in your closets or you can still find them on eBay, etc.
To Start
So, this past week I began the task of reorganzing them all. I started by setting the stack on the steps to my studio. It made it easier to sit on the steps, spread out, and work. I dictated the name and manufacturer of every single stencil into a note on my phone. It was very quick to dictate them as I worked. Now I have a digital list of all of my stencils.
The Mini Clip it Up
First, the Mini Clip it Up is perfect for my stencils. It fits on my art table, they hang nicely, and it fits a wide variety of sizes. The stencils sizes I have on here are:
4.3" x 5.7"
4.125″ x 8.5″
6"x6"
6"x9"
8.5"x8.5"
They all fit on here so well, and they are easy to grab, use, wash, and put away. And yes, I usually wash my stencils. If they are still a bit wet after washing, they will dry nicely like this. I wash them because I have found that some paints, mists, etc., do react with other products and end up on my pages. It's not always the color I want, and I don't like the mess. So, washing it is for me. :) I have a few that I did not get washed so you will see a few dirty ones.
Hanging the Stencils
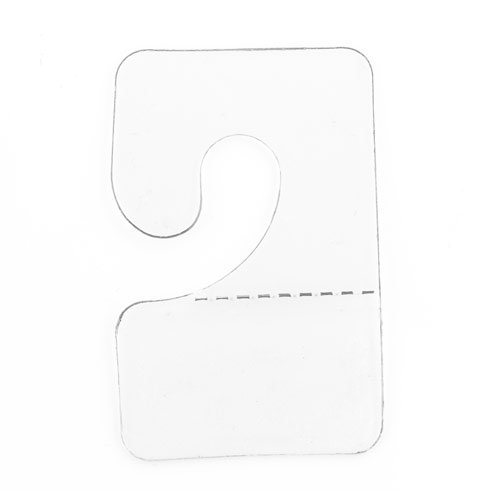
To hang the stencils, I used two different products. I used the Simply Renee clips, and I also used clear J hooks that I got from amazon.com. They look like this:
The reason I used two different items to hang the stencils is first because if I only used the Simply Renee clips, all of my stencils would not fit. The clips are awesome but they do take up a bit of room. I only used the clips on stencils in which the clear J hook would not work for instance, intricate doily stencils, etc. The clear J hooks don't take up any room at all, and you can fit more stencils on the Mini Clip it Up. Here you can see a J hook on a Tim Holtz stencil. This makes storage super flat, and if these clips get paint on them, no problem. They are plastic.
Identifying the Stencils
Some companies have their name along with the stencil name printed right on the stencil just like the Tim Holtz stencil above. Love that. Some, however, do not. In those instances, I used my permanent marker to write the name on the stencil itself. This helps when I create products lists for a blog post.
Storage Order
I put the stencils on the Clip it Up in alphabetical order by design. For instance:
Alpha/Number
Circles
Diamonds
Doilies
Hearts
Lattice
Squares
Words
Etc., etc., etc.
I chose not to put them in order by stencil name because I can never remember the name of a particular stencil, and I certainly don't always remember the manufacturer either. This works for me.
Well, I hope this has been helpful and that some of you may resurrect those old mini Clip it Up units. Have fun organizing, and let me know your thoughts or if you have questions in the comment section below. Have a blessed weekend!