Showing posts with label Glory Art Tips. Show all posts

Tuesday, September 15, 2015

Text Blocks for {Journaling} Bible

Today I thought we would talk about creating text blocks. Angela posted this comment on Sunday's post:

"I love how you do the text blocks. Do you print each word out as you need them or do you keep a stash of suitable words in different styles and fonts?"

First, I do not keep a stash of words. I basically find them or create them as I create my page. And to help give you an idea of how I create them, I thought I would share a few ideas with you. Let's get started.

Letter Stickers
I use letter stickers a lot. I almost always stick them to a piece of paper first so that I can either stitch on them (as I did with the word 'witness'), make sure the spacing is correct, or even cut them down. I did cut down each sticker in the word 'humility'. It was too wide to fit in the margin so I cut down the letters to make them thinner. There is almost always a wide margin on letter stickers so it's easy to change their size. You can also create fun backgrounds for your words by sticking them to a piece of paper first. You can see what I did differently with the word 'me' below.

Stamps
I use stamps on every single Journaling Bible page. I have several sets that are my "go to" sets that I love. Again, I generally stamp on another piece of paper first so I can stitch or create a fun background. I also use tickets. They are really fun to use on pages.

Some of my favorite alpha stamp sets that I use are the following sets:

*Upper and Lowercase Alpha sets from etsy.com. There are many sellers that have these sets.
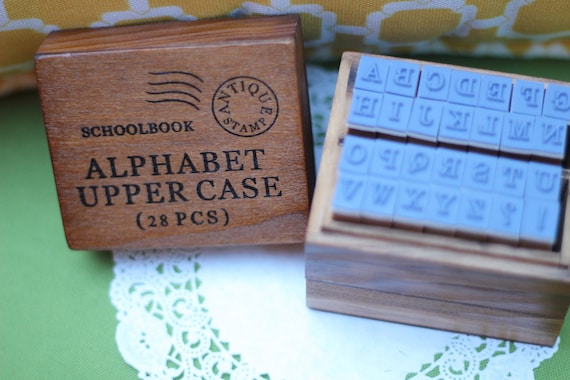
*Provo Craft Rolling Stamp sets. I have had these for many, many years but I am sure you can find them on eBay or various places.

Typewriter
I have a 1960's Smith-Corona typewriter that sits on my craft table. I just love it, and I use it a lot. I type on everything from deli paper, hymn paper, ledger paper, stickers (see how I typed the word 'blotted out' on the tag sticker below), or anything else I can find. I do use Judikins Microglaze once I type the letters so that it becomes waterproof. For more information, see my link about Microglaze below.

Helpful Links
I have posted about how I have specifically created some of these text boxes. I will link them here if you want to see those posts also.

*EnvelopesSee how I stamped the word 'trust' in this post here about using envelopes for texture.

*Deli PaperSee how I stamped the word 'wait' on deli paper in this post here. Deli paper makes a great hidden background.

*MicroglazeLearn more about how I use it in this post here.

Other Products
There are plenty of word and alpha stickers available on the market. I will link what I can at the bottom of this post. Some of my favorites are:

*Tim Holtz Chit Chat StickersI almost always outline these for fun.

*My Mind's Eye Tiny Alpha StickersThey have many colors and varieties. I keep all colors on hand and use them a lot. They also have a few words available in each set.

*Simple Stories Alpha StickersMore great letter stickers that come in a lot of colors and work great for Journaling Bible pages. I used these stickers for the word 'Christ' above.

*Papers UsedI use old book paper, deli paper, newsprint paper, hymn paper, etc. to add letters, typing, and stamping.

I hope you have found this post helpful. Have fun finding ways to create unique text boxes for your pages. Enjoy, and thanks for stopping by!

Product List (click product tags for more information)

View blog post for supplies


Sunday, August 23, 2015

Glory Art {Tips} Christ-Esteem Step-by-Step Journaling Page

Let's Create

Note: Most supplies I have used are listed at the bottom of the lesson post and it includes links to the products. Click here to see that post with product links.

1. Collage book paper on page with Ranger Multi Medium Matte.
2. Place strips of masking tape on page.
3. With old hotel key, spread Liquitex Super Heavy Gesso on page.
4. Mist page with Dylusions Ink Sprays in fresh lime, London blue, and vibrant turquoise.
5. Use the Dylusions London blue mist to add circles and splatters to the page.
6. Use Golden black gesso to add more circles and splatters.

Here is what the page looks like now:


7. Use the Donna Downey Blooming Floral Flowers stencil and Dylusions London blue paint to stencil flowers onto old book paper. Cut out when dry and set aside.


8. Using Hero Arts India Ink black, stamp all over the page with various stamps. I used Mixed Media Essentials #1 by Paper Bag Studio and the sole of a flip flop.
9. Paint Adirondack citrus paint on edges of page with fingers and also stencil on the same paint using Tim Holtz burlap stencil.
10. Stamp title onto page with Technique Tuesday Big Timber Outline UC and LC with the India ink used above. Use waterbrush to color letters using Dylusions London Blue mist.
11. Paste flowers set aside in Step 7 onto page.
12. Type scripture onto ledger paper. Sew edges, and paste onto page.
13. Doodle on flowers and around entire page to finish.


To see more photos, the product list, and the lesson that goes with this page, please click here. Thanks for joining me. To see all of the previous Glory Art {Tips} tips, please see this post here. Happy creating

Sunday, August 9, 2015

Glory Art {Tips} Maturity Step-by-Step Journaling Page

Let's Create


Note: Most supplies I have used are listed at the bottom of the lesson post and it includes links to the products. Click here to see that post with product links.

1. Collage page with Christy Tomlinson tissue paper and Ranger Multi Medium Matte.
2. Using Liquitex Modeling Paste and Donna Downey's Blooming Floral stencil as well as TCW Mini Circle Explosion stencils to add texture to the page. Let dry.
3. Color the page with Bombay India Ink teal and green, Prima Color Bloom Mist emerald, and Luminarte's lime squeeze.
4. Use Pigma Micron 08 pen to outline small, textured circles.
5. Paint an old book page with Art Anthology lagoon paint. After it's dry, stamp various sized circles with Liquitex Heavy Gesso. Cut circles out after they dry, and set aside.

6. Using Prima Color Bloom Mist emerald again, put drops all over the page.
7. Print scriptures onto Project Life Journaling card, and sew around edges.
8. Add stenciling on top of scriptures using Donna Downey's Blooming Floral stencil and Luminarte's lime squeeze.
9. Place circles from Step 5 onto left-hand side of the page. Stitch through the center of the circles if desired before adhering to the page. Save one circle for the right-hand side of the page.
10. Adhere scriptures to the page as well as title. I used American Crafts Remarks Hickory stickers.
11. Use Pigma Micron 08 pen to outline title, scriptures, and circles.
12. Use Golden Black Gesso to stamp more circles on the page and to create black splatters to finish.

To see more photos, the product list, and the lesson that goes with this page, please click here. Thanks for joining me, and I hope you enjoy creating an art journaling page. To see all of the previous Glory Art {Tips} tips, please see this post here. Have fun!

Sunday, May 10, 2015

Glory Art {Tips} Painting and Sticker Packs

I have two separate tips for you todaya painting tip and getting the most out of a sticker pack.

Painting
You will notice on my Journaling Bible page today that I used paint over the scriptures. I usually do not like doing that but I have pulled out some of my translucent paints so you can still read His Word. The translucent paints I have and love are by Art Anthology and Studio paint by Claudine Hellmuth. I used Art Anthology paints today.

To add the paint to my page, I just put a dab on an old card (credit card, hotel room key, etc.), and I drag the paint across the page. It is a quick and easy way to get color down onto your page. You can see mine below as I started. But I must say that I am a bit disappointed in my photography of this page. I tried many different things to get it to look like it does in person but it just did not work. The blue is barely showing up. So imagine more blue than what is showing here but remember, the paint is translucent so it is a very nice "wash" over the text.


Tim Holtz Chit Chat Stickers
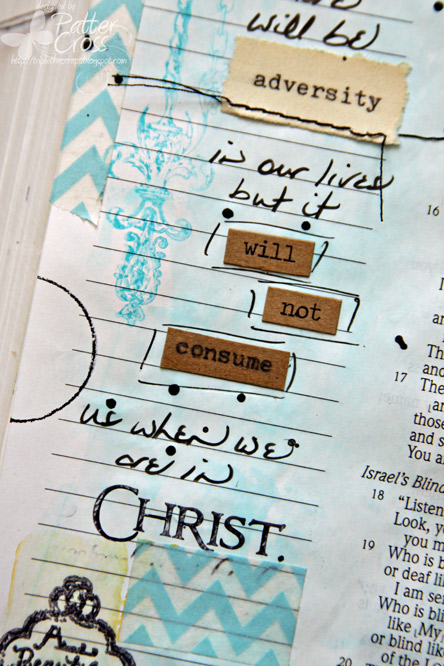
The Tim Holtz Chit Chat word stickers are great for all of your creations. There are 6 pages of words3 pages on white cardstock and 3 pages on kraft cardstock for a total of 1088 stickers.

The only issue is that this sticker book can't possibly have every word you would ever need. Well, I have a solution for that. If you notice at the very top of each page, there is a blank space between the top row of words and the spiral binding. That space can be trimmed to type your own words. That is what I did for today's page. This sticker book did not have the word "consume" so I cut it out from the top of the kraft page at the back. Then I typed the word on my manual typewriter, trimmed it, and added it to my page. I also saved the remaining piece so that I can type another word in the future. I just added it back to the spiral binding as you see below.


I hope you find today's tips helpful. Have fun painting and creating your own word stickers! Blessings,

Product List (click product tags for more info)
View blog post for supplies

Sunday, April 12, 2015

Glory Art {Tips} Another Step-by-Step Art Journaling Page

Today, I wanted to share another step-by-step art journaling page. I hope you find these helpful and find some fun ideas to add to your pages. For my inspiration, I used the Eroded Brights color combination from Design-Seeds.

I already had some underpaper with the teal and pink on it, so I collaged that paper and some map paper onto a blank art journaling page to begin. Underpaper and map paper are always great to have on hand. I recently got a new car, and in cleaning out the old car, I found several old AAA maps that I no longer needed so I added them to my art journaling stash. Be sure to check your car for older maps. They make great backgrounds. Now let's look at the steps to create this page.

Let's Create

Note: Most supplies I have used are listed at the bottom of this post.

1. Collage page with torn pieces of map paper and under paper using Collage Pauge. Here is what the page looks like at this point:

2. Using an old credit card, spread gesso all over page, and my page now looks like this:
3. With Art Anthology's Waimea mist and a stencil, mist a bit of color around the page.
4. With punchinella and Dina Wakley's ruby acrylic paint, add painted circles.
5. Using the Delta Daises stencil and Dina Wakley's lapis acrylic paint, add flowers.
6. Stamp circles with Memory Box Ring and Dot stamp using Dina Wakley's magenta paint. Also add circles with the same paint using American Crafts dot brayer.
7. Stamp all over the page using Archival cobalt ink and Unity Wood Grid stamp.
8. Cut a piece of paper from an old Bath and Body Works shopping bag to use for scriptures or journaling. White wash with gesso to tone the down blues.
9. Print scriptures, trim, and ink edges with Tim Holtz Distress Ink chipped sapphire. Finish with Judikins Microglaze.
10. Stamp title with Tim Holtz Worn Text stamps and Dina Wakley lapis paint, stitch around bag, add scriptures, and glue to page.

11. Using Blue Fern Studios Halftone stamp set, stamp on page using Hero Arts India Ink black in corners and Dina Wakley magenta paint on page and on the bag with scriptures.

12. Doodle all over page to finish.


To see more photos, the product list, and the lesson that goes with this page, please click here. Thanks for joining me, and I hope this has helped you in creating an art journaling page. To see all of the previous art tips, please see this post here. Now go look for some old maps and have fun!

Sunday, March 22, 2015

Glory Art {Tips} Collage Paper

When creating a background for your art journaling page, Scripture Art Cards, etc., why not use some collage paper? You can certainly collage a background yourself with various book papers, tissue paper, etc., but collaged paper does the job for you and makes the process a bit faster.

For today's cards, I used the new Blue Fern Studios Love Story Amazing Heart paper. Here you can see Side A (black paper side) and Side B (the collage paper side). I used Side B for today's cards.

You can see how beautifully collaged Side B is. Today I used this paper to create four Scripture Art cards. Here you can see the four cards cut out with this paper.

Next I used an old iTunes card to put a bit of gesso on the paper to tone down the color a bit. After that, I ran my brayer over the wet gesso to give it more texture. Here you can see the two cards on the left have had gesso applied and the brayer used on top. The two on the right have not been touched yet. I wanted you to be able to see how the gesso mutes the paper just enough for creating my cards.

After that, I layered a bit of paint and black gesso circles. When you use collage paper, you don't need to add many layers if you do not want to. Collage paper makes your creation look more layered than it is. Here is how my cards turned out. To see more photos, please see my post here.

Thanks for stopping by, and grab some collage paper for your next creation! Blessings,

Product List (click product tags for more info)

View blog post for supplies

Sunday, February 22, 2015

Glory Art {Tips} A Makeup Sponge and a Flip Flop

Now from today's title, you are probably wondering what the tip is going to be today. Well, these are a couple of things that I have learned in Christy Tomlinson's online classes, and they have become things that I use a lot for added texture to my creations. So grab a makeup sponge and a flip flop, and let's get started. :)

Makeup sponges are inexpensive, and you can use them in a lot of ways. This tip I love because it's a different shape than I usually use. I am a circle girl. You probably see circles on most of my creations. Well, this time we are going to cut the sponge so that you create a square. Make sure when you purchase a package of sponges that they can be easily cut into a square. I like to buy the wedge-shaped sponges. Once you have the sponge cut, dip it into some acrylic paint or ink and stamp away. Such an easy, fun technique. Here you can see two of my cards "in process" after stamping some squares using white acrylic paint. Below that, you will see another example of stamping squares. I am creating a canvas, and it is "in process" and not nearly done but I thought you would enjoy seeing another example of stamped squares.


When purchasing flip flops, look at the sole of the shoe. They have many different patterns. The one I have and love has lines. You can see how I stamped the lines on my card. I used black ink but I also use gesso a lot too as you can tell from the flip flop piece. Yes, I do cut the flip flops so they are easier to handle. Buying children's flip flops work great!

Thanks for joining me, and remember, to see all of the previous art tips, please see this post here. I hope you have enjoyed today's easy and inexpensive tip! Have fun with those flip flops and sponges. Blessings,

Product List (click product tags for more info)

View blog post for supplies

Sunday, February 8, 2015

Glory Art {Tips} Step-By-Step Art Journaling Page

Today I thought I would share my process for creating today's art journaling page. I love this video by Andrea Walford. Click here to see her video. I started my background just as she shows in her video. From that point, however, I take it my own way but I did use a tag too like she does. Let's get started. 

The Journal
I am using a Ranger Dyan Reaveley's Dylusions Creative Journal (link at the bottom of this post). I love this journal. I have both sizes that I use but for this particular page, I used the 11 3/8" x 8 1/4" journal. I also kept track of supplies and the step-by-step process on the opposite page. I have never done that before but I think I will like it. Because of things going on in our lives right now, I did this page over the course of many days. Writing things down as I did them, really helped.

Let's Create

Note: All supplies I have used are listed at the bottom of this post.

1. Put rub-ons on your page. No need to prep the page in anyway. Just put those rub-ons down.
2. Cover the rub-ons with matte medium.
3. Use your fingers to spread three colors of acrylic paint.
4. Put down some torn book paper in various places. Use matte medium or a glue stick.
5. Use black, waterproof ink to stamp around the page.
6. Put some white gesso on a large paintbrush, dip in water, and whitewash the entire page.
7. Once that is dry, use your fingers to smear white gesso around the edges and on various places on the page.

Here is how the page looks after Step 7:

8. Using a flower stamp or any other large image, stamp the image using acrylic paint onto book paper. Let dry then cut out.
9. Glue flowers to the page and doodle around them using a waterproof pen.
10. Dip a piece of bubble wrap into white gesso and stamp it around the page and on a tag. Let dry.
11. Sew around the edges of the tag and add journaling/scriptures. Add ribbon and glue to page.
12. Using black india ink, put splatters on the page. You can also use watered down black acrylic paint or black gesso.
13. Stamp the word 'truth' using black acrylic paint.
14. Use white correction pen to add details to the flowers.
15. Use a lid and white gesso to stamp white circles on the page.
16. Use white correction pen to add scribbles to the page.
17. Stamp date to finish.

Here is how my page turned out. For more detailed photos, please click here or go to the post just above this one.


Thanks for joining me, and I hope this has helped you in creating your own page. To see all of the previous art tips, please see this post here. Have fun with it, and don't be afraid to watch art journaling videos for inspiration. Blessings,

Product List (click product tags for more info)

View blog post for supplies

Sunday, January 25, 2015

Glory Art {Tips} Using Envelopes for Texture

Need more texture? Why not save all of those security envelopes you get in the mail? They are free, and a great way to recycle. I have piles of them saved up, and I love to use them. 

On today's creation, the security envelope was not the color I wanted. It had a black and white background but I wanted a blue background. So, why not paint it? I chose to use my favorite watercolors (Kurtake Watercolors) because they are transparent, and it would not cover up the great texture of the envelope.

See how the texture still shows through, and I get the blue color I wanted? Love it! I then tore the envelope into strips and put them onto the base of my four Scripture Art Cards. I added a bit of distress paint and began layering to create today's cards. Notice how I also used underpaper that we discussed in the last Glory Art {Tips} post. So, this is how today's cards started out!

I also stamped some leaves onto the envelope using distress paint. I cut the leaves out and also used them on today's cards.

Now for the final product. You can see how I used the envelope in three different ways for these cards:
  • for the title on the card
  • the stamped leaves
  • the layers underneath that I started with
See how it all just adds more texture?

You can use envelopes on any creation. Look how I even used it on my Journaling Bible page from a couple of weeks ago. I painted the envelope yellow, stamped the word 'trust', then used my sewing machine to sew around the edges before putting it into my Bible. You can see that Journaling Bible post here.

So, save those envelopes. They are free, and you can change them into any color for your creations to add great texture. Thanks for stopping by, and click here to see all of the tips posted thus far. Have fun!

Product List (click product tags for more info)
View blog post for supplies
Related Posts with Thumbnails