Showing posts with label Organization. Show all posts

Monday, December 17, 2018

{Organization} Farmhouse Wire Tiered Stand

Run don't walk to a Pottery Barn near you if you are looking for a 3-tiered stand! This Farmhouse Wire Tiered Stand was $59.50 but now is $22.99. I grabbed it, and I must say I LOVE it!

Here are the dimensions as listed on the Pottery Barn site:

DIMENSIONS
Overall: 12" wide x 12" deep x 30.25" high
Small basket: 8.25" diameter, 4" high
Medium basket: 10.5" diameter, 5" high
Large basket: 12" diameter, 6" high
Space between baskets: 4.5"
Weight capacity: 3.25 pounds (per basket)
Weight: 4.75 pounds

It could be used for anything! I should have purchased more than one because one in the kitchen would have been adorable. Oh well. Anyway, while I loved my paint storage, I did want to go vertical because I could store so much more. So I moved my paints from my mini Clip-it Up to this. Here is the before and the after:


Because I moved my gesso and other mediums to the basket also, I have opened up storage elsewhere. I am SO excited about that. The sides also hold things such as my Tim Holtz stapler. I am sure I will find other goodies to hang on the side also.

I hope you enjoyed this. Sometimes going vertical can be the best thing for storage and organization! Have a great week! Blessings,

Monday, February 5, 2018

{Organization} Chipboard Re-do

Most of you remember when I designed for Blue Fern Studios. It still has been on of my favorite companies to work for, and I still love their products. With that said, I still have a lot of chipboard. I love it, and I love to design with it. I did not do any scrapbook pages last year or use any chipboard but that will change this year. But first, I had to reorganize what I had. In 2013, I posted about how I kept the chipboard in a binder. That worked great for a while but the binders got so full and warped over time. If you want to see my original storage method and post, click here. So obviously, that storage method was no longer working for me.

Then, this week, I had a few clear stamps that I needed to put away. As I was doing that, I thought "Why don't I store the chipboard the same way?" So, I then began my chipboard reorganization! I pulled out these supplies and got to work:

  • Neenah bright white cardstock
  • Trimmer
  • Avery Elle large storage pockets
  • typewriter
  • labeler
  • DVD divider cards
I cut down the Neenah cardstock to 7 1/4" x 5 1/2" and typed the name of the chipboard set onto that piece. Then I slipped it into the Avery Elle storage pocket followed by the chipboard. Perfection!

As I kept going through my stash, there were some sets that just had one piece of chipboard. I didn't want to waste a storage pocket for just one piece of chipboard. So, I listed each of the pieces on the cardstock and put the chipboard into the same pocket. In the photo below, I have three different sets of chipboard but they are all trinkets of some sort. So, you can see how I put them together in the same pocket.

As far as words and titles, I did something similar as above. Most of these words were individually packaged. So, I put the words on the cardstock sheet in alphabetical order and slipped them all into the pocket. As I use that word, I will probably use a pencil to line it out on the cardstock. That way I will know that I no longer have that particular word.

All of the pockets are then stored in alphabetical order in a kitchen organizer bin. Behind the chipboard, I then store my clear alpha stamps in the same pockets. The bin sits in a cubbie in my studio. I think this is going to work perfectly for me.


So, think out of the box. What supplies can you organize this way? What do you already organize this way? I hope today's post spurs some ideas for you. Have a blessed week!

Wednesday, January 31, 2018

{Organization} Clickable Alpha Stamps

If you remember the first Glory {Art} Rewind post for this year, you saw that I used this alphabet on my art marks page. If you missed that post, click here. What I didn't mention in that post is that storing these alphabets is a real pain. I know some people just keep them stuck together in a block. But for me, that was an awful solution. I was always having to undo the block to get the letters I needed which were inevitably in the middle of the block. I have had these for quite some time but rarely used them because of the storage issue and trying to find the letter I wanted to use. But I love these stamps. They are so perfect when stamped.


So, this past weekend I was on a mission to find a storage solution so that I can use these stamps more this year. Well, I found it! It's a double-sided carrier that I found at Hobby Lobby. I used my 40% off coupon, and it turned out to be the perfect storage for these alpha stamps.

There are 46 fixed compartments, and once I put in each letter, number, and symbol, I only have 4 compartments left open. Perfect! I labeled each compartment so it's quick to grab what I want and put the letters away too. This carrier has a handle and stands on end to store. I put it on the floor next to my table, and it is working perfectly!

So, if you have these stamps, how do you store them? They are great stamps if you have a storage solution you like. Glad I finally found the option I love! Have a blessed day!

Thursday, December 28, 2017

{Organization} Die Cuts, Wood Veneers, and More

Messy Desk
Over the past few weeks, I have been cleaning my studio. It has not been cleaned this well since we left Texas 5 1/2 years ago. I want my studio to be ready for the new year so that I can create without the stress of messes. I also now have a good handle on what I still have after getting rid of a lot of things. Here you can see one of my desks before I cleaned it and then the after photo. It feels SO good to have a beautifully clean desk.


IKEA Fintorp
I also purchased new items from Ikea to help with the organization of my art desk. I am loving this too. The Ikea pieces are hanging on the wall in the photo, and it is from the Fintorp line if you are interested.


To see more information on the other paint storage, look here and here.

Die Cuts
One thing I still really struggled with has been die cuts. I had drawers full of them, and I didn't use them much because I could never find what I wanted. My first attempt at organizing them, I tried the binder method organizing by color. After putting several pieces into my binder, I realized this took way too much time, and it was not going to work for me at all.

So, I purchased an Iris case with 16 smaller cases. I then organized the die cuts by color; however, the first four cases contain these die cuts: doilies, months/weekdays, numbers, and multi-color. It is SO fast to sort them this way, so easy to see what I have, and now I will actually be able to use them this year. I also was able to empty three drawers in my Scrap 'n Cube so I can store something else in those drawers. Here is what my new die cut storage looks like:


Wood Veneer
My wood veneers have been in a case for 4 1/2 years, and I love to store them that way. The only trouble I had was with the numbers so I just kept them in the original packaging in a drawer. I still wasn't happy with that so I put them in a smaller case I had in the basement, labeled them, and this little container fits happily in a Scrap 'n Cube drawer for easy access. Really excited about how this turned out too.

To see my other wood veneer storage, click here.

Thanks for joining me, and if you have caught the cleaning bug like I have, I hope you finish soon. I know that is what I am hoping for myself too! :)

Thursday, January 26, 2017

Personal Printer Bag!

If you remember my post from a week or so ago, I compared the differences between photos printed from personal photo printers. If you missed that post, click here. My newest printer and favorite printer is the Epson Picture Mate PM400. I love to keep my little printer in a bag because I take it downstairs to work on. It's so much easier to carry everything that way. Plus if I want to take it to a crop or something, it's packed and ready to go and the dust also stays away. However, the directions for this printer clearly state that you cannot turn it on its side because the ink could leak. Well, because of its size, any bag I had the printer would have had to be turned onto its side to carry in the bag. Darn! So the search for an appropriate bag began. I found one, and I can say that I am extremely pleased!

The measurements of this little printer are 6.5 x 16.4 x 10.9 inches, and the Thirty-One Perfect Party Set bag works perfect! I am now naming it the "Perfect Photo Printer Set." :) It's actually an expensive bag but you can find used ones for as low as $29 on eBay. And probably any 9x13 dish carrier would work. Let's look at what I can get inside.

Here you see the bag closed. It can expand to hold even more but I do not need to use it 
that way currently.

Inside I can fit the printer, ink, and there is space for a little something else.

Or if I want, I can put extra paper inside. The ink and paper would also work well 
together in that spot.

Or the paper can also fit in the top pocket. Here you can see four packages of 
paper in the top. I could fit more there if I wanted.

Also inside the bag without using the expanded option, I can put extra Project Life pages 
or even pages in progress on top of the printer! Note that I do 8 1/2 x 11 pages. 
The 12x12 pages would not fit in here.

And here you see that it fits perfectly without opening it up to the expanded option. This bag 
would certainly hold a lot more if it were expanded.

I am super pleased with this bag. It is perfect for this printer! Now I can just grab it with my pages in progress inside and take to any location in the house or on vacation or to a crop. Hope this helps some of you that want a bag also for your printer. Enjoy, and thanks for stopping by!

Friday, August 19, 2016

Organization {Friday} Tube Paints

Agh, tube paints. I love them as well as all of the other paints I have; however, they were not organized quite like I like them. So I searched for another Simply Renee Mini Clip-it Up. I had one and used it for my stencil organization which has worked amazing for me. If you missed that post, click here. So, I thought this same concept would work great for my tube paints.

I found someone that had a Mini Clip-it Up that they were not using so I purchased it from them. It arrived and that afternoon, my tube paints looked like this:


They are clipped up in color order, and this sits right on the edge of my art table. It is very easy to see the paints I want to use and makes it easy to put them away. If you are unable to find the discontinued Simply Renee Mini Clip-it Up, you can certainly make your own. There are lots of ideas on Pinterest. Also, feel free to look at my other paint organization post by looking at these posts:

Tube Paints (original storage)

Please note that the Mainstays organizer noted in the 2nd link is where I now have my Tim Holtz Distress Paints standing. Thanks for stopping by, and enjoy your weekend!

Sunday, May 22, 2016

Organization {Friday} Travel Art Bag

Yes, it's Sunday. Yes, I am posting a Friday post on Sunday. But, we just got back from a glorious 1 1/2 week vacation. And today I wanted to share with you what I took along and how I was able to create during our vacation time. First, I knew I wanted to take an art bag. While I have tried to put together art bags in the past, I never liked what I came up with. Well, I think I finally found what I love, and I used daily on our trip.

The Bag
I purchased a Vera Bradley Large Blush and Brush makeup bag from eBay. This bag retails for $52 but have seen it from about $28 so be sure to watch the prices if you look for one. It has lots of pockets and then even pockets for brushes (see pictures below). This bag is perfect for your projects, and easy to take along with you.

Contents


So, what did I put in this bag? Well, my thought was to journal and watercolor so that dictated what I decided to put inside for this trip. So, here is what I packed in this wonderful bag.

  • Global Art Materials 5-1/2-Inch by 5-1/2-Inch Drawing Book
  • (15) 5x5 printed coloring pages
  • Scrap paper
  • Glue stick
  • Tape runner
  • Scissors
  • Faber-Castel Clic and Go Collapsible cup (not pictured)
  • (28) Winsor and Newton watercolor half pans
  • (3) Washi tapes
  • (5) Pigma Micron pens, various sizes
  • (2) Waterbrushes, various sizes
  • (2) Simply Simmons paint brushes size 12 round and 3/4" flat wash
  • (3) labels
  • Illustrated Faith Bible mat
  • 6" ruler
  • Mechanical pencil
  • Pitt pens
  • Whiteout pen
  • Stabilo All pencil
  • Pencil sharpener
  • Papertowels
  • 2"x3" Acrylic block (not pictured)
  • Technique Tuesday Classic Ali Edwards stamp set
  • Technique Tuesday Explore Arrows stamp set
  • Project Life date stamp
  • (2) Hotel keys
  • Brayer
  • Archival jet black ink

Printed Coloring Sheets
The coloring sheets I took with me were ones I printed for free from the web. Most are from Alisa Burke as I love her style. I put the images into a Microsoft Word document, resized, and printed two to a landscape page onto regular printer paper. Once printed, I trimmed to 5x5. To see some of the pages I used, feel free to look at my Pinterest Coloring Pins by clicking here.

To store the coloring sheets, I just put them inside the journal. They fit nicely. And because the elastic band keeps the journal closed, the papers did not fall out or get bent in my travel art bag.

My Creations
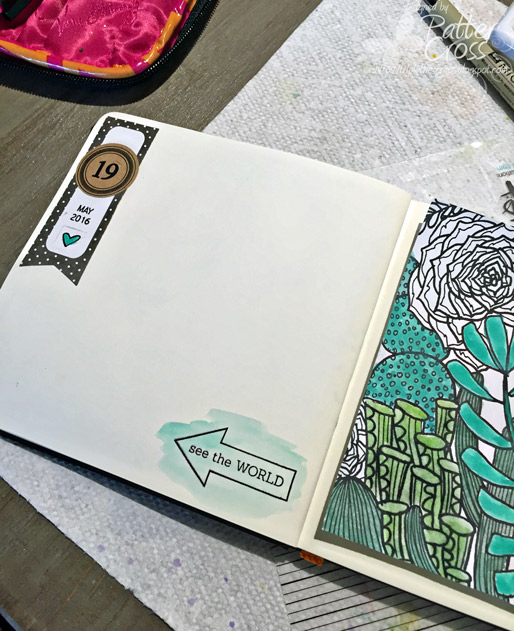
Here are a few of my pages from our trip. This journal allowed me to have fun with art while I was gone while also journaling about our trip. To paint and color my pages, I used this video from Alisa Burke as inspiration.


Thanks for joining me, and as always, let me know if you have questions in the comment section. I will answer there. I would also love to know what you think. And I hope you have fun packing your own travel art bag! Have a blessed week ahead everyone!

Product List (click product tags for more info)

View blog post for supplies

Related Posts with Thumbnails